Introduction
Plastering is one of the most critical stages in building construction. It serves a dual purpose: protecting the raw brick masonry from harsh environmental conditions and creating a smooth, aesthetically pleasing surface for painting. However, a common problem encountered on Indian construction sites is the inaccurate estimation of raw materials. This often leads to either costly mid-project material shortages or massive material wastage that inflates the civil budget.
Accurately calculating the cement required for plastering is not just an administrative task; it is a core structural necessity. Applying a mortar mix with incorrect proportions or mismatched thickness can result in structural defects such as shrinkage cracks, map cracking, hollow sounds, and plaster peeling off the wall over time.
This comprehensive engineering guide provides a step-by-step breakdown of how to calculate the exact cement and sand requirements for a standard 100 square foot wall area. It includes clean, plain-text mathematical formulas, concrete real-world site scenarios, critical conversion indices, and professional on-site quality control checklists.

Understanding Plaster Types, Thickness, and Mix Ratios
The volume of cement mortar required for plastering depends on three key variables: the location of the wall (internal vs. external), the type of underlying masonry surface (brick, AAC block, or concrete), and the specified structural mix ratio.
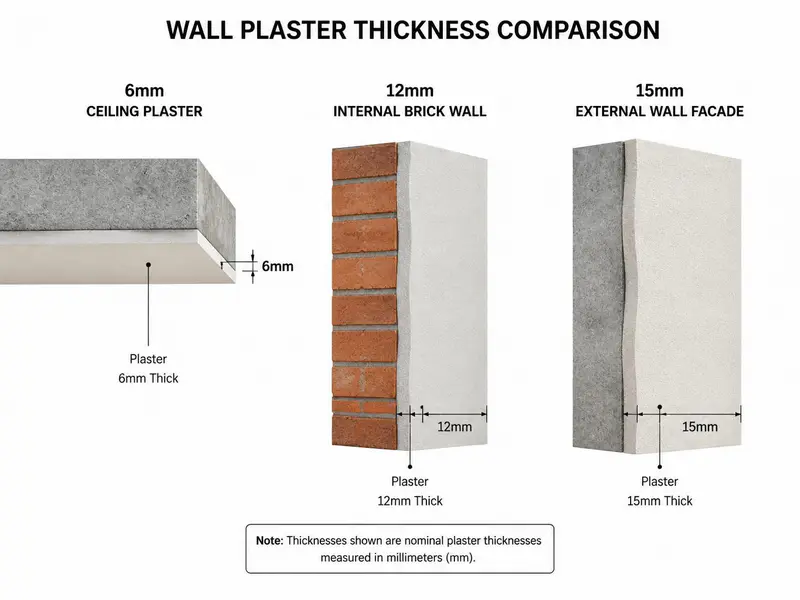
Plaster Thickness Standards based on Application Location
- Internal Wall Plastering: Usually applied at a thickness of 12 mm. This is sufficient to smooth out minor misalignments in brickwork where the surface is protected from direct weather elements. For highly uniform surfaces like AAC blocks, a 9 mm layer may be specified.
- External Wall Plastering: Applied at a thickness of 15 mm to 20 mm. This is typically executed in a single layer of 15 mm or a double layer (12 mm rough coat followed by an 8 mm finish coat) to provide a weather-resistant barrier against heavy rains and thermal expansion.
- Ceiling / Roof Slab Plastering: Restricted to a maximum thickness of 6 mm. Because gravity acts directly on the overhead plaster mortar, thicker applications increase the risk of debonding and falling.
Recommended Mortar Mix Ratios (Cement : Sand)
The mix ratio defines the proportion of cement to sand by volume.
- Ratio 1:3: Used for ceiling plastering and high-strength patch repairs. It contains a high concentration of cement to ensure maximum adhesion.
- Ratio 1:4: The standard engineering specification for external walls and high-load architectural surfaces. It offers an optimal balance of structural strength and water resistance.
- Ratio 1:5: The most common mix design utilized for standard internal brick walls.
- Ratio 1:6: An economical mix configuration applied strictly to internal partition walls or surfaces that will be covered by heavy structural cladding or wood paneling.
Summary Material Matrix Table for 100 Sq. Ft. Wall
| Plaster Type | Standard Thickness | Mix Ratio (Cement:Sand) | Approx Cement Bags Needed | Sand Required (CFT) | Application Scenario |
|---|---|---|---|---|---|
| Ceiling Plaster | 6 mm | 1:3 | 0.45 Bags | 2.0 CFT | Overhead RCC slabs |
| Internal Plaster | 12 mm | 1:4 | 0.76 Bags | 3.4 CFT | Internal high-wear walls |
| Internal Plaster | 12 mm | 1:5 | 0.63 Bags | 3.5 CFT | Standard internal rooms |
| Internal Plaster | 12 mm | 1:6 | 0.55 Bags | 3.7 CFT | Economy internal partitions |
| External Plaster | 15 mm | 1:4 | 0.95 Bags | 4.2 CFT | Standard external facades |
| External Plaster | 20 mm | 1:4 | 1.26 Bags | 5.6 CFT | Heavy monsoon exposure zones |
If you are planning a complete residential project and want to estimate the total budget, read our comprehensive breakdown on 2BHK House Construction Cost in India 2026 – Complete Cost Guide
Core Mathematical Formulas for Plastering Calculation
To accurately determine the material quantities on-site without using complicated software or broken formatting codes, engineers rely on standard plain-text calculations. These formulas convert a flat surface area into a three-dimensional volume, which is then adjusted for drying shrinkage and structural irregularities.
Step-by-Step Computational Math Formulas (Plain Text)
- Total Area of Wall Geometry:
Wall Area = Length of Wall x Height of Wall - Theoretical Volume of Wet Mortar:
Wet Volume = Wall Area x Thickness of Plaster Layer - Total Design Dry Volume Estimation:
Dry Volume = Wet Volume x 1.33 + Wastage Factor Allowance
(Note: Dry sand and cement compress significantly when mixed with water. Engineers use a multiplier of 1.33 to convert wet volume to dry volume. To account for joint filling, uneven masonry, and minor cutting drops, we add an extra 10% to 20% on-site, bringing the typical combined dry volume multiplier to 1.35 or 1.40).
For standard site calculations: Dry Volume = Wet Volume x 1.35 - Component Material Share Factor:
Total Mix Parts = Cement Part + Sand Part
(For instance, in a 1:4 mix design, Total Mix Parts = 1 + 4 = 5) - Volume of Cement Required:
Volume of Cement = (Dry Volume / Total Mix Parts) x Cement Part Share - Number of 50 Kg Cement Bags:
Number of Cement Bags = Volume of Cement / Volume of One Standard Cement Bag
(Where Volume of One 50kg Cement Bag is fixed at 0.0347 Cubic Meters or 1.226 Cubic Feet) - Volume of Sand Required:
Volume of Sand = (Dry Volume / Total Mix Parts) x Sand Part Share
Practical Step-by-Step Examples with Concrete Numbers
Let us apply these formulas to real-world scenarios on an active construction site. We will calculate the exact material requirements for a 100 square foot wall surface area under three different standard specifications.

Example A: 12 mm Thick Internal Wall Plaster with a 1:5 Mix Ratio
This is the most common configuration for internal residential spaces.
Step 1: Calculate the Wet Volume of Mortar
- Wall Area Specification = 100 Square Feet
- Thickness Convert to Feet = 12 mm / 25.4 mm per inch / 12 inches per foot = 0.03937 Feet
- Wet Volume = 100 sq. ft. x 0.03937 ft = 3.937 Cubic Feet (CFT)
- Converting to Cubic Meters = 3.937 / 35.3147 = 0.1115 Cubic Meters (Cum)
Step 2: Calculate the Dry Volume (Including 10% Joint Filling & Site Wastage)
- Dry Volume = Wet Volume in Cubic Meters x 1.35
- Dry Volume = 0.1115 x 1.35 = 0.1505 Cubic Meters (Cum)
Step 3: Determine the Cement Quantity
- Mix Ratio = 1:5 (Total Parts = 1 + 5 = 6)
- Volume of Cement = (0.1505 / 6) x 1 = 0.0251 Cubic Meters (Cum)
- Number of Cement Bags = 0.0251 / 0.0347 = 0.72 Bags
- Weight of Cement = 0.72 bags x 50 kg = 36.16 Kilograms (Kg)
Step 4: Determine the Sand Quantity
- Volume of Sand = (0.1505 / 6) x 5 = 0.1254 Cubic Meters (Cum)
- Converting Sand to Cubic Feet = 0.1254 x 35.3147 = 4.43 Cubic Feet (CFT)
Example B: 15 mm Thick External Wall Plaster with a 1:4 Mix Ratio
This configuration is typical for external walls exposed to regular weathering.
Step 1: Calculate the Wet Volume of Mortar
- Wall Area Specification = 100 Square Feet
- Thickness Convert to Feet = 15 mm / 25.4 / 12 = 0.04921 Feet
- Wet Volume = 100 sq. ft. x 0.04921 ft = 4.921 Cubic Feet (CFT)
- Converting to Cubic Meters = 4.921 / 35.3147 = 0.1393 Cubic Meters (Cum)
Step 2: Calculate the Dry Volume (Including 10% Joint Filling & Site Wastage)
- Dry Volume = 0.1393 x 1.35 = 0.1881 Cubic Meters (Cum)
Step 3: Determine the Cement Quantity
- Mix Ratio = 1:4 (Total Parts = 1 + 4 = 5)
- Volume of Cement = (0.1881 / 5) x 1 = 0.0376 Cubic Meters (Cum)
- Number of Cement Bags = 0.0376 / 0.0347 = 1.08 Bags
- Weight of Cement = 1.08 bags x 50 kg = 54.18 Kilograms (Kg)
Step 4: Determine the Sand Quantity
- Volume of Sand = (0.1881 / 5) x 4 = 0.1505 Cubic Meters (Cum)
- Converting Sand to Cubic Feet = 0.1505 x 35.3147 = 5.31 Cubic Feet (CFT)
Example C: 6 mm Thick Overhead Ceiling Plaster with a 1:3 Mix Ratio
This thin, rich mix is designed for ceiling concrete surfaces.
Step 1: Calculate the Wet Volume of Mortar
- Ceiling Surface Area = 100 Square Feet
- Thickness Convert to Feet = 6 mm / 25.4 / 12 = 0.01968 Feet
- Wet Volume = 100 sq. ft. x 0.01968 ft = 1.968 Cubic Feet (CFT)
- Converting to Cubic Meters = 1.968 / 35.3147 = 0.0557 Cubic Meters (Cum)
Step 2: Calculate the Dry Volume (Including 10% Joint Filling & Site Wastage)
- Dry Volume = 0.0557 x 1.35 = 0.0752 Cubic Meters (Cum)
Step 3: Determine the Cement Quantity
- Mix Ratio = 1:3 (Total Parts = 1 + 3 = 4)
- Volume of Cement = (0.0752 / 4) x 1 = 0.0188 Cubic Meters (Cum)
- Number of Cement Bags = 0.0188 / 0.0347 = 0.54 Bags
- Weight of Cement = 0.54 bags x 50 kg = 27.11 Kilograms (Kg)
Step 4: Determine the Sand Quantity
- Volume of Sand = (0.0752 / 4) x 3 = 0.0564 Cubic Meters (Cum)
- Converting Sand to Cubic Feet = 0.0564 x 35.3147 = 1.99 Cubic Feet (CFT)
Critical Construction Unit Conversions
Material orders for construction projects often require converting between different volumetric and structural mass measurements. Below is a quick-reference conversion matrix used by site engineers to verify procurement receipts.
Standard Conversion Factors
| Initial Material Metric | Target Procurement Metric | Clean Mathematical Multiplier |
|---|---|---|
| Cubic Meter (Cum) | Cubic Feet (CFT) | Multiply by 35.3147 |
| Cubic Feet (CFT) | Cubic Meter (Cum) | Multiply by 0.02831 |
| Cubic Meter of Cement | Number of 50 Kg Bags | Multiply by 28.818 |
| Cubic Feet of Cement | Number of 50 Kg Bags | Multiply by 0.8156 |
| Brass (Indian Site Unit) | Cubic Feet (CFT) | 1 Brass = 100 Cubic Feet (CFT) |
| Brass (Indian Site Unit) | Cubic Meter (Cum) | 1 Brass = 2.8316 Cubic Meters |
| Kilograms (Kg) | Metric Tons (MT) | Multiply by 0.001 |
Site Quality Control, Wastage Mitigation, & Engineering Precautions
Accurate calculations only work if the on-site execution is managed properly. Mismanaging water ratios, skipping surface preparation, or letting material go to waste can compromise the durability of the plaster.

On-Site Quality Control Checklists
- Hacking/Chipping Concrete Surfaces: Before applying plaster to concrete structures like columns, beams, or ceilings, ensure the surface undergoes mechanical hacking. Create at least 30 to 40 indents (hacks) per square foot, cut to a depth of 2mm to 3mm. This provides a mechanical key that prevents the smooth mortar from sliding off.
- Applying Chicken Wire Mesh at Junctions: Dissimilar structural materials expand and contract at different rates under thermal changes. Always bridge the joints between concrete elements (columns/beams) and brick walls with a 200mm wide galvanized chicken wire mesh (or fiber mesh) centered over the joint line before plastering. This prevents structural shear cracks.
- Pre-Wetting the Masonry Base: Dry bricks absorb water rapidly from freshly mixed mortar. If the brickwork is not thoroughly pre-wetted 24 hours before plastering, it will pull moisture away from the mortar mix, halting the chemical hydration of the cement and leaving the plaster weak and powdery.
- The Mortar Drop Test: Freshly mixed cement mortar must be used within 60 minutes of water addition. Any mortar that has begun its initial setting process in the mixing pan will lose its cohesive properties and should be discarded.
Common Causes of Material Wastage and Mitigation Strategies
- Excessive Rebound Loss: When plaster is thrown onto a wall surface, a portion bounces off and falls to the floor. This rebound loss typically ranges from 5% to 15%. To reduce wastage, place clean polythene tarpaulins along the base of the wall. This allows clean, unpolluted fallen mortar to be immediately collected and re-mixed before it begins to set.
- Thick Plastering Due to Poor Masonry Alignment: If a brick wall is built out of plumb, plasterers are often forced to increase the plaster thickness up to 25mm or 30mm on one side to make the wall look flat. This significantly inflates material consumption. To avoid this, always enforce strict plumb-bob checks during the brick masonry phase.
Frequently Asked Questions (FAQs) – SEO Feature
Q1: Why do we add a dry volume multiplier of 1.33 to 1.35 in plastering calculations?
Cement and sand in their dry states contain high volumes of air voids between their individual microscopic particles. When water is introduced, these fine particles dissolve and reposition, filling the air voids and reducing the net volume by roughly 33% to 35%. The 1.35 multiplier ensures you purchase enough dry material to yield the required volume of wet mortar on-site.
Q2: What happens if the cement content in the plastering mix is too high?
A common misconception is that adding more cement makes plaster stronger. A mix that is too rich (e.g., 1:1 or 1:2) undergoes significant dry shrinkage during curing. This leads to extensive map cracking across the wall surface, making it easier for moisture to penetrate and eventually causing the plaster layer to separate from the wall.
Q3: How long should plaster be cured after application?
Plastered walls must be kept continuously damp through water curing for a minimum of 7 to 10 days. Curing allows the cement to continue its chemical hydration process, helping the plaster achieve its full design compressive strength and preventing early dry shrinkage cracks.
Q4: Can I use Manufactured Sand (M-Sand) for internal plastering?
Yes, you can use Manufactured Sand (M-Sand) for plastering, provided you order specific Plastering M-Sand. Plastering M-Sand is carefully sieved to remove coarse particles and has a maximum grain size of 1.5mm to 2.2mm. Standard concrete M-Sand is too coarse and will tear the finish during the troweling stage, leaving a rough, uneven texture.
Q5: Why does a hollow sound sometimes occur when tapping a plastered wall?
A hollow sound indicates a localized failure in the bond between the plaster layer and the underlying brick masonry surface. This debonding typically happens if the brick wall was not cleared of dust and loose soil before application, if the surface lacked sufficient moisture when plastered, or if the structural hacking on concrete elements was skipped.
According to Bureau of Indian Standards (BIS) guidelines, cement mortar ratios such as 1:4 and 1:6 are commonly used for wall plastering in building construction.
Conclusion
Accurately calculating the cement required for plastering is essential for maintaining control over your construction budget and ensuring long-term structural quality. For a standard 100 square foot wall area, a 12mm thick internal plaster coat (1:5 mix) requires approximately 0.72 bags of cement, while a 15mm thick external coat (1:4 mix) requires about 1.08 bags.
To avoid project delays, always purchase your cement and sand with a 10% to 15% buffer to account for natural site wastage, rebound loss, and mortar joint gaps. Pair your material calculations with rigorous on-site supervision, proper surface pre-wetting, and disciplined water curing to ensure smooth, crack-free walls that stand the test of time.
Shakeel T is a qualified Civil Engineer and Structural Consultant with extensive on-site experience in residential and commercial building construction. Specializing in material estimation, cost budgeting, and structural safety guidelines, he has successfully managed multiple real estate projects from foundation to finishing. Through this blog, Shakeel shares field-tested civil engineering thumb rules, IS Code practices, and practical site tips to help home builders execute their projects efficiently and within budget.
Education: Diploma in Civil Engineering
Expertise: Quantity Surveying, Material Estimation, Structural Design, and Site Management.