Introduction
Cement is undeniably the structural binder of modern residential architecture. From the deep subterranean reinforced concrete footprints that anchor your home against seismic motion to the delicate surface mortars that prepare your walls for paint, cement dictates both structural longevity and financial stability. When embarking on a residential project, guessing material quantities or relying blindly on unverified local vendor estimates is an invitation to financial distress and compromised building integrity.
An inaccurate material estimate leads to two highly destructive site scenarios. Over-ordering causes premium cement bags to sit idle on site, where ambient monsoon humidity triggers premature air-setting, rendering expensive stock useless. Conversely, under-ordering creates abrupt logistical work stoppages during critical reinforced cement concrete (RCC) monolithic structural pours, creating cold joints that permanently weaken columns and slabs.
Executing a flawless cement calculation for 1000 sq ft house construction requires a meticulous, systematic engineering breakdown of every building phase. This highly comprehensive civil engineering guide provides the exact plain-text mathematical formulas, realistic step-by-step calculations, conversion indices, and empirical on-site quality control metrics required to optimize your material procurement and build an enduring structure.
Structural Component Cement Allocation (The Standard Thumb Rules)
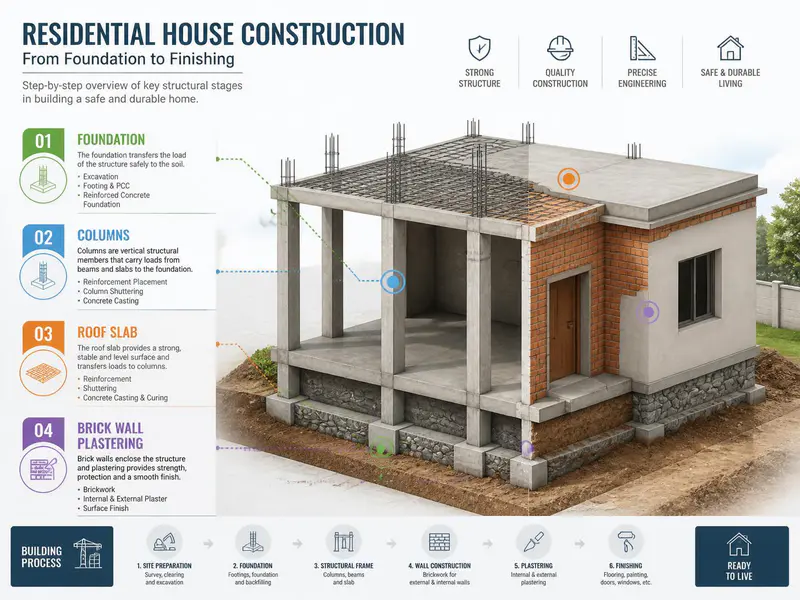
In day-to-day operations on an active Indian construction site, civil engineers implement verified empirical structural “thumb rules” to establish baseline material procurements. These benchmarks are derived from historical data across thousands of standardized residential builds. For a standard multi-room B-Class or A-Class residential layout, cement consumption is distributed across five fundamental civil engineering execution phases.
As a general baseline, a typical single-story load-bearing or framed residential structure consumes 0.4 bags to 0.45 bags of cement per square foot of total built-up area. Therefore, a standard 1,000 sq. ft. footprint requires roughly 400 to 450 standard 50 kg cement bags.
Phase-Wise Cement Consumption Allocation Matrix
| Construction Structural Phase | Percentage Share of Total Cement | Average Consumption Range (1,000 Sq. Ft. House) | Recommended Cement Selection Type |
|---|---|---|---|
| 1. Substructure & Foundation | 15% | 60 to 70 Bags | OPC 43 Grade / Portland Slag Cement |
| 2. RCC Framed Superstructure | 35% | 140 to 160 Bags | OPC 53 Grade / Premium PPC Brand |
| 3. Masonry Wall Brickwork | 20% | 80 to 90 Bags | PPC (Portland Pozzolana Cement) |
| 4. Internal & External Plastering | 20% | 80 to 90 Bags | PPC (Portland Pozzolana Cement) |
| 5. Flooring Beds & Tiling Tiles | 10% | 40 to 45 Bags | Standard PPC / White Cement Variants |
Core Civil Engineering Formulas for Material Estimations
To safeguard your financial capital and effectively audit material logs from contractors, you must understand the basic volumetric equations used on-site. These formulas are presented in plain text to ensure seamless formatting in your WordPress Gutenberg editor.
Structural Volumetric and Mass Math Formulas (Plain Text)
- Dry Volume Conversion Coefficient:
Dry Volume of Mix = Net Wet Structural Volume x 1.54
(Note: Dry sand, gravel, and cement contain a high volume of air pockets between individual grains. When water is added, the mix compresses down significantly. To obtain 1 cubic meter of wet consolidated concrete, you must source 1.54 cubic meters of raw dry ingredients). - Cement Bag Requirement for Concrete (Based on Design Ratios):
Total Cement Bags = (Dry Volume of Element / Total Sum of Mix Proportions) x Cement Share Part x (Density of Cement / Mass of Single Bag)
(Where Density of Cement is universally calculated at 1440 kg per cubic meter, and a standard commercial bag contains exactly 50 kg of material). - Dry Volume Coefficient for Mortar (Plaster / Brickwork):
Dry Volume of Mortar = Net Wet Mortar Volume x 1.33 - Cement Count for Brick Masonry Wall Elements:
Cement Volume in Masonry = (Dry Mortar Volume / Total Sum of Masonry Proportions) x 1
To understand different foundation systems, check our Types of Foundation in Construction article.
Step-by-Step Practical Calculations for a 1,000 Sq. Ft. Structural Footprint
Let us systematically compute the exact cement bag configurations across the key structural components of a standard 1,000 sq. ft. single-story residential frame.
Phase A: Reinforced Concrete Foundation Footings
Assume your structural engineer specifies 12 independent isolated column footings across the 1,000 sq. ft. building envelope. Each footing trench measures 1.2 meters x 1.2 meters x 0.3 meters. The structural concrete design requires an M20 Grade Mix (Ratio 1:1.5:3 representing 1 part Cement, 1.5 parts Fine Sand, and 3 parts Coarse Aggregate).
Step 1: Calculate Net Wet Structural Volume
- Volume of One Footing = 1.2m x 1.2m x 0.3m = 0.432 Cubic Meters
- Total Wet Volume for 12 Footings = 0.432 x 12 = 5.184 Cubic Meters (Cum)
Step 2: Convert to Dry Volumetric Mass
- Total Dry Volume = 5.184 x 1.54 = 7.983 Cubic Meters (Cum)
Step 3: Determine the Cement Quantity
- Sum of M20 Mix Proportions = 1 + 1.5 + 3 = 5.5
- Volume of Cement Required = (7.983 / 5.5) x 1 = 1.451 Cubic Meters (Cum)
- Total Weight of Cement = 1.451 cubic meters x 1440 kg/m³ = 2089.44 Kilograms (Kg)
- Total Cement Bags Needed = 2089.44 kg / 50 kg per bag = 41.78 -> 42 Bags
Phase B: Structural Framed Columns & Beams
Let us calculate the concrete requirements for the vertical load-bearing columns across the structure. Assume there are 12 vertical columns, each with a cross-section of 0.23 meters x 0.30 meters and a height of 3.0 meters. We will use an M20 concrete mix (1:1.5:3).
Step 1: Calculate Net Wet Structural Column Volume
- Volume of One Column = 0.23m x 0.30m x 3.0m = 0.207 Cubic Meters
- Total Wet Volume for 12 Columns = 0.207 x 12 = 2.484 Cubic Meters (Cum)
Step 2: Convert to Dry Volumetric Mass
- Total Dry Volume = 2.484 x 1.54 = 3.825 Cubic Meters (Cum)
Step 3: Determine Cement Bag Count
- Volume of Cement Required = (3.825 / 5.5) x 1 = 0.695 Cubic Meters (Cum)
- Total Weight of Cement = 0.695 cubic meters x 1440 kg/m³ = 1000.8 Kilograms (Kg)
- Total Cement Bags Needed = 1000.8 kg / 50 kg per bag = 20.01 -> 20 Bags
Phase C: The Monolithic Roof Slab Casting

The roof slab covers the entire 1,000 sq. ft. footprint. In standard residential construction, a structural roof slab is cast to a uniform thickness of 5 inches (125 mm or 0.125 meters) using an M20 structural mix (1:1.5:3).
Step 1: Convert Area to Metric Dimensions
- Total Footprint Area = 1,000 Square Feet = 92.903 Square Meters (Sqm)
Step 2: Calculate Net Wet Volumetric Slab Concrete
- Total Wet Volume = 92.903 sqm x 0.125 meters thickness = 11.613 Cubic Meters (Cum)
Step 3: Convert to Dry Volumetric Mass
- Total Dry Volume = 11.613 x 1.54 = 17.884 Cubic Meters (Cum)
Step 4: Determine Cement Bag Count
- Volume of Cement Required = (17.884 / 5.5) x 1 = 3.251 Cubic Meters (Cum)
- Total Weight of Cement = 3.251 cubic meters x 1440 kg/m³ = 4681.44 Kilograms (Kg)
- Total Cement Bags Needed = 4681.44 kg / 50 kg per bag = 93.62 -> 94 Bags
Phase D: Wall Masonry Brickwork Filling
Assume the house features a total volume of 32 cubic meters of standard brick masonry walls. The engineering specification demands a 1:6 cement-to-sand mortar mix. Bricks will occupy roughly 70% of the total wall volume, leaving the remaining 30% for wet mortar.
Step 1: Isolate the Net Wet Mortar Volume
- Total Wet Mortar Volume = 32 Cubic Meters x 0.30 = 9.6 Cubic Meters (Cum)
Step 2: Convert to Dry Volumetric Mortar Mass
- Total Dry Mortar Volume = 9.6 x 1.33 = 12.768 Cubic Meters (Cum)
Step 3: Determine Cement Bag Count
- Sum of Mortar Mix Proportions = 1 + 6 = 7
- Volume of Cement Required = (12.768 / 7) x 1 = 1.824 Cubic Meters (Cum)
- Total Weight of Cement = 1.824 cubic meters x 1440 kg/m³ = 2626.56 Kilograms (Kg)
- Total Cement Bags Needed = 2626.56 kg / 50 kg per bag = 52.53 -> 53 Bags
Phase E: Interior and Exterior Surface Plastering
Assume the total surface area across all internal partitions and external facades requires 450 square meters of 12mm thick plastering coat, utilizing an optimized 1:5 cement-to-sand mortar mix.
Step 1: Calculate Net Wet Plastering Mortar Volume
- Thickness in meters = 12mm = 0.012 meters
- Total Wet Mortar Volume = 450 square meters x 0.012 meters = 5.4 Cubic Meters (Cum)
Step 2: Convert to Dry Volumetric Mortar Mass (Including 15% Brick Joint Filling losses)
- Total Dry Mortar Volume = 5.4 x 1.33 x 1.15 = 8.259 Cubic Meters (Cum)
Step 3: Determine Cement Bag Count
- Sum of Mortar Mix Proportions = 1 + 5 = 6
- Volume of Cement Required = (8.259 / 6) x 1 = 1.376 Cubic Meters (Cum)
- Total Weight of Cement = 1.376 cubic meters x 1440 kg/m³ = 1981.44 Kilograms (Kg)
- Total Cement Bags Needed = 1981.44 kg / 50 kg per bag = 39.62 -> 40 Bags
Critical Civil Engineering Unit Conversions
On an active construction site, material invoices, truck delivery notes, and masonry layout sheets frequently mix metric and imperial units. Use this conversion table to cross-verify site metrics during material deliveries.
Standard Volumetric and Mass Transformation Reference Table
| Convert From Metric Unit | Convert To Target Metric Unit | Precise Multiplication Factor |
|---|---|---|
| Cubic Meter (Cum / m³) | Cubic Feet (CFT) | Multiply by 35.3147 |
| Cubic Feet (CFT) | Cubic Meter (Cum / m³) | Multiply by 0.02831 |
| Cubic Meter of Neat Cement | Number of Commercial 50 Kg Bags | Multiply by 28.818 |
| Cubic Feet of Neat Cement | Number of Commercial 50 Kg Bags | Multiply by 0.8156 |
| Metric Ton (MT) | Kilograms (Kg) | Multiply by 1,000 |
| Metric Ton (MT) | Number of Commercial 50 Kg Bags | 1 Metric Ton = Exactly 20 Bags |
| Brass (Regional Construction Unit) | Cubic Feet (CFT) | 1 Brass = 100 Cubic Feet (CFT) |
| Brass (Regional Construction Unit) | Cubic Meter (Cum / m³) | 1 Brass = 2.8316 Cubic Meters |
Site Quality Controls, Storage Protocols, & Wastage Mitigation

Even the most accurate calculations can fall short if material management on site is poor. Unchecked material waste, improper storage, and careless mixing habits are the primary drivers of budget overruns. Enforce these on-site protocols during your daily construction inspections:
Essential On-Site Cement Quality Field Tests
- The Manufacturing Date Verification Check: Always inspect the factory stamp on the side of the cement bag. Cement is a perishable binding agent. Bags stored for more than 3 months past their manufacturing date lose roughly 20% to 30% of their compressive strength due to moisture absorption from the air. Any bag older than 6 months should be rejected for structural applications like beams or slabs.
- Color Uniformity and Texture Inspections: Open a random sample bag from every incoming truck. The cement must display a completely uniform, light greenish-gray color profile. Thrust your bare hand deep into the bag; it should feel noticeably cool to the touch, indicating no hydration reactions have begun inside. Rub the powder between your fingers—it must feel perfectly smooth, without any hard gritty lumps.
- The Volumetric Water Floating Test: Take a small handful of cement powder and drop it into a bucket filled with clean water. The fine particles should float on top of the water surface for a few moments before sinking. If the sample sinks instantly like sand, it indicates high contamination or pre-exposure to moisture.
Safe Storage Protocols to Prevent Air-Setting
- Elevated Log Timber Platforms: Never stack cement bags directly on bare concrete slab ground or topsoil. Set up a raised timber pallet platform at least 30 cm (1 foot) above floor level.
- Perimeter Clearances: Stack cement bags at least 50 cm away from exterior masonry walls to prevent dampness from seeping into the packaging.
- Stack Height Restrictions: Limit stack heights to a maximum of 10 bags. Stacking bags higher can cause compaction issues in the bottom layers, breaking the fine grain structure and reducing performance.
- The FIFO Material Management Protocol: Enforce a strict First-In, First-Out (FIFO) material flow. Ensure your site team uses older deliveries first to keep material fresh and minimize shelf-life degradation.
Frequently Asked Questions (FAQs) – SEO Feature
Q1: Can I use OPC 53 Grade cement for all stages of a 1,000 sq. ft. house construction?
While OPC 53 (Ordinary Portland Cement) provides excellent structural strength for heavy load-bearing RCC elements like columns, beams, and slabs, it is not recommended for wall plastering or brick masonry work. Its rapid heat of hydration can cause significant drying shrinkage cracks on thin surface coatings. For plastering and masonry, PPC (Portland Pozzolana Cement) is a better choice, as it offers a slower setting time, improved workability, and better long-term resistance to fine cracks.
Q2: How many total cement bags are needed for a 1,000 sq. ft. independent residential build?
For a standard single-story 1,000 sq. ft. framed structure, you will need approximately 400 to 450 standard 50 kg bags of cement. This baseline estimate covers the entire structural workflow, including foundations, columns, beams, roof slab casting, brick wall masonry, internal/external plastering, and tile bed installations.
Q3: Why do we implement a 1.54 multiplier when calculating raw concrete mixtures?
In its dry state, concrete aggregate components (cement, fine sand, and crushed gravel) contain a significant volume of air gaps between individual grains. When water is added and the mixture is consolidated on site, the fine sand and cement dissolve to fill these voids. This reduces the net volume of the wet mixture by roughly 54%. The 1.54 multiplier ensures you order enough raw dry ingredients to achieve the finished, consolidated volume of wet concrete required.
Q4: How does using Manufactured Sand (M-Sand) affect cement consumption?
Using concrete-grade Manufactured Sand (M-Sand) can slightly alter your cement requirements depending on the grain shapes in the batch. If the M-Sand has rough, angular grains or a high percentage of fine dust, the mixture will require more water to remain workable. To maintain the designed structural strength, you must adjust the water-to-cement ratio by adding a small amount of extra cement, typically increasing consumption by 3% to 5% compared to well-graded river sand.
Q5: What is a “cold joint” in concrete construction, and how does cement management prevent it?
A cold joint forms when a fresh batch of concrete is poured against a layer that has already begun its initial setting process. This creates a distinct plane of structural weakness through the element. To prevent cold joints during critical, high-volume castings like roof slabs, your site supervisor must coordinate material mixing speeds and verify that enough cement bags are on hand before the pour begins.
Cement quality in India-2026 is regulated by the Bureau of Indian Standards (BIS)
According to the Cement Manufacturers Association of India, cement demand continues to grow with increasing infrastructure development.
Conclusion

Successfully managing a 1,000 sq. ft. residential construction project requires transforming abstract architectural blueprints into precise material procurement schedules. By breaking down your project into distinct structural phases—from foundations to finished surface plaster—you can establish a clear baseline demand of 400 to 450 bags of cement.
To protect your construction budget, look beyond simple formulas. Enforce strict on-site storage practices to prevent moisture damage, verify material quality through regular field tests, and use proper dry-volume multipliers to account for material compaction. Combining precise engineering calculations with disciplined on-site oversight is the most effective way to build a safe, durable home that will last for generations.
Shakeel T is a qualified Civil Engineer and Structural Consultant with extensive on-site experience in residential and commercial building construction. Specializing in material estimation, cost budgeting, and structural safety guidelines, he has successfully managed multiple real estate projects from foundation to finishing. Through this blog, Shakeel shares field-tested civil engineering thumb rules, IS Code practices, and practical site tips to help home builders execute their projects efficiently and within budget.
Education: Diploma in Civil Engineering
Expertise: Quantity Surveying, Material Estimation, Structural Design, and Site Management.