Introduction
Building your own home is one of the most important emotional and financial achievements in life. It symbolizes stability, success, and a living space designed specifically for your family’s needs. However, many homeowners find construction sites intimidating because of the heavy machinery, technical terminology, construction materials, and constant site activity. Understanding the Building Construction Process Step by Step can help eliminate confusion and give you greater confidence throughout the project.
The key to a smooth and stress-free home-building experience is knowing that construction follows a planned and systematic sequence rather than a random set of activities. By learning the Building Construction Process Step by Step, you can monitor progress more effectively, manage costs wisely, prevent contractor-related issues, and identify potential mistakes before they become costly problems. This practical guide explains every stage of construction, from an empty plot to the final handover, in a simple and easy-to-understand manner.

Phase 1: Pre-Construction (The Blueprint & Permission Stage)
Long before any heavy excavators roll onto your property, the success of your home is decided on paper. Skipping steps in this phase is like steering a ship without a compass. Spending time here prevents legal battles, structural failures, and unexpected budget shortfalls down the road.
+------------------------------------------------------------+

|                  PRE-CONSTRUCTION SEQUENCE                 |
+------------------------------------------------------------+

| Soil Test -> Architectural Plan -> Engineering -> Permits  |
+------------------------------------------------------------+
1. Soil Testing and Site Survey
- What happens: A geotechnical team visits your plot, drills deep into the ground, and collects core soil samples to analyze its load-bearing capacity. Simultaneously, a surveyor maps the exact boundaries and slope of your land.
- Why it matters: Different soils behave differently under weight. For example, black cotton soil expands when wet and shrinks when dry, which can easily crack a house. The test tells your engineer whether you need a simple flat footing or deep concrete piles.
- Real-world site tip: Never let a local contractor convince you that a soil test is an unnecessary luxury. Building a standard foundation on unverified, weak soil can cause your entire house to tilt or sink over time.
2. Architectural and Structural Designing
- What happens: You work with an architect to design your floor plans, room layouts, ventilation patterns, and interior styles. Once the aesthetic design is locked, a structural engineer designs the invisible “skeleton” of the house—calculating the exact thickness of columns, beams, and the precise arrangement of steel rebars.
- Why it matters: The architect makes your home beautiful and functional; the structural engineer ensures it doesn’t collapse during an earthquake or heavy storm.
3. Comprehensive Budget Estimation
- What happens: You calculate a Bill of Quantities (BOQ), which outlines the total volume of cement, steel, bricks, sand, tiles, and labor required for the entire build.
- Why it matters: This keeps your finances grounded. Having a detailed BOQ prevents the nightmare of running completely out of cash when the house is only half-built.
4. Permits, Approvals, and Legal Clearances
- What happens: You submit your structural and architectural drawings to the local municipal corporation, development authority, and utility boards to obtain formal building permits.
- Why it matters: Building without local authority approval can result in heavy government fines, forced demolition, or a permanent denial of water and electricity connections.
Phase 2: Substructure Construction (Building Your Ground Foundation)
The substructure refers to everything built below the ground level. Its sole job is to anchor your house to the earth and safely transfer the immense weight of the walls, roof, and furniture into the solid soil beneath.
1. Site Clearing and Preparation
- What happens: Workers clear the plot of all surface wild plants, tree roots, old debris, organic topsoil, and large boulders to create a clean, safe, and unobstructed workspace.
- Why it matters: Leftover tree roots or buried organic material will rot over time, creating hollow air pockets beneath your floors that can cause sudden ground cave-ins.
2. Centerline Layout Marking
- What happens: Using the structural drawings, the contractor uses long measuring tapes, wooden pegs, and white lime powder lines to map out the exact location of every column and foundation pit on the raw ground.
- Why it matters: A mistake here means your house could be built crooked or accidentally encroach on your neighbor’s property line.
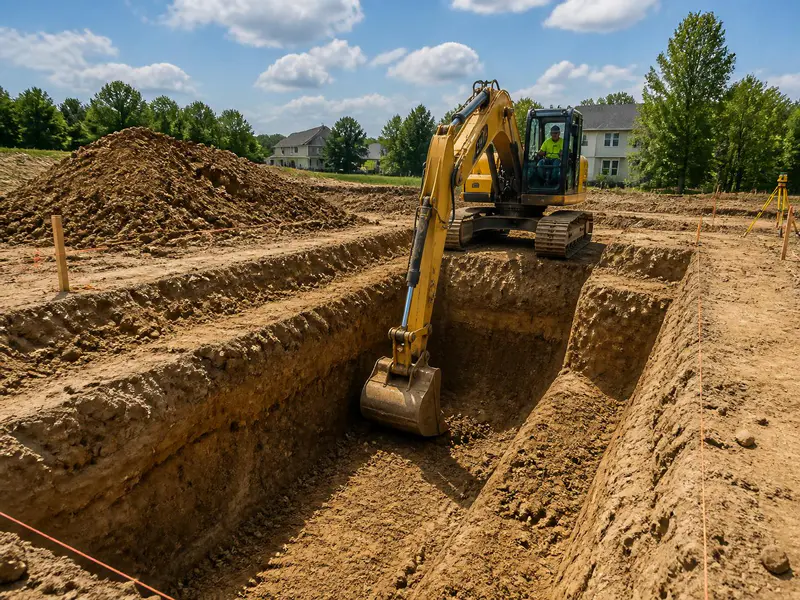
3. Excavation Works
- What happens: Heavy earthmovers (like JCBs or excavators) dig deep trenches and wide square pits into the ground based on the marked centerline layouts.
- Why it matters: The pits must reach down to the firm, load-bearing soil layer specified in your soil test report, bypassing loose topsoil.
4. Laying the PCC (Plain Cement Concrete) Base
- What happens: Workers pour a thin, level layer of plain concrete (cement, sand, and stone chips without any steel reinforcement) at the bottom of the open dirt pits.
- Why it matters: This creates a perfectly flat, solid, mud-free workstation. It prevents the structural steel meshes from touching raw dirt, which would introduce moisture and cause the steel to rust prematurely.
5. Footing Reinforcement and Foundation Pouring
- What happens: Heavy steel reinforcement mats (rebar grids) are lowered into the pits. Vertical steel cages for the columns are tied into these mats. High-strength concrete is then poured to encapsulate the steel, forming solid footing pads.
- Why it matters: This forms the heavy anchor pads of your home, ensuring the vertical pillars remain locked in place forever.
6. Plinth Beam Construction & Damp-Proof Course (DPC)
- What happens: A continuous, horizontal band of reinforced concrete beams is cast across all columns right at ground level. On top of this beam, a thin layer of waterproof cement mortar or plastic membrane (DPC) is applied.
- Why it matters: The plinth beam ties all your pillars together so they move as a single unit, preventing uneven settling. The DPC acts as a shield, stopping groundwater from wicking up into your brick walls and causing peeling paint, damp patches, and mold.
7. Backfilling and Ground Compaction
- What happens: The empty, excavated spaces around the foundation footings are refilled with clean soil or sand. This backfill is heavily soaked with water and compacted using mechanical ramming machines.
- Why it matters: Poorly compacted foundation soil will sink later under the weight of your floor tiles, causing your beautiful flooring to crack and drop unevenly.
Phase 3: Superstructure Construction (Erecting the Heavy Frame)
The superstructure is the visible shell of your building above the ground line. This is the highly rewarding stage where your architectural drawings finally transform into a physical, multi-dimensional home.
+------------------------------------------------------------------------+

|                         SUPERSTRUCTURE STEPS                           |
+------------------------------------------------------------------------+

| Cast Columns -> Shuttering Roof -> Lay Slab Steel -> Pour Roof Concrete |
+------------------------------------------------------------------------+
1. Column Casting (The Vertical Pillars)
- What happens: Steel rebar cages extend upward from the foundation. Workers secure temporary vertical wooden or steel molds (called shuttering or formwork) around these cages and fill them with concrete.
- Why it matters: Columns are the primary legs of your house. They carry the weight of the entire roof and transfer it safely down to the ground.
- Real-world site tip: Ensure that the formwork is completely vertical using a plumb-bob tool. Even a minor lean in a column severely reduces its structural strength.
2. Beam and Roof Slab Formwork (Shuttering)
- What happens: Once the columns are strong and self-supporting, carpenters construct a massive, temporary horizontal platform made of plywood, steel sheets, and adjustable props across the ceiling level.
- Why it matters: This temporary staging acts as a mold that supports the immense weight of wet, heavy concrete until it cures and can support itself.
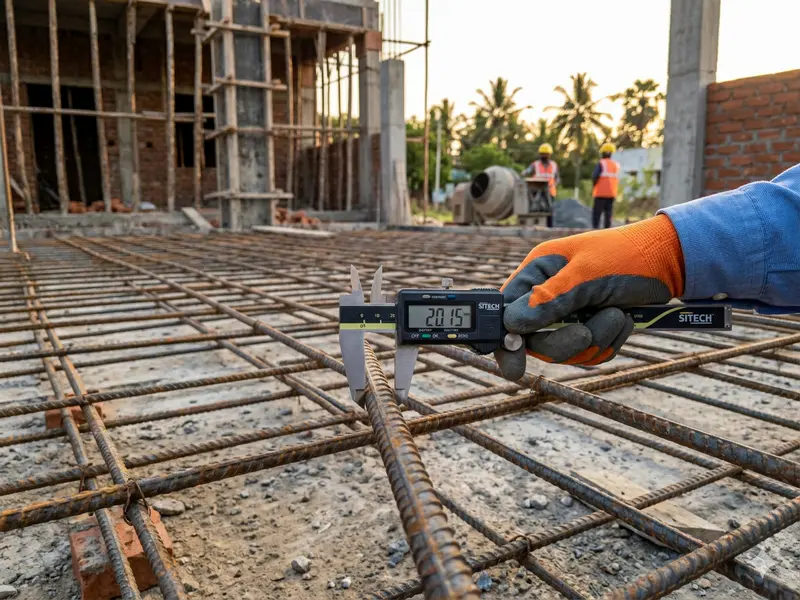
3. Laying Slab Rebar (The Core Quality Check)
- What happens: Steel fixers lay out an intricate grid of steel reinforcement bars across the horizontal wooden deck based on the structural engineer’s plan.
- Why it matters: This is where the critical quality inspection of rebar diameter and spacing before authorizing the concrete pour takes place. You must physically verify that the spacing matches the drawings and that small spacer blocks are placed under the steel grid to prevent the metal from touching the wood.
4. The Roof Concrete Pour
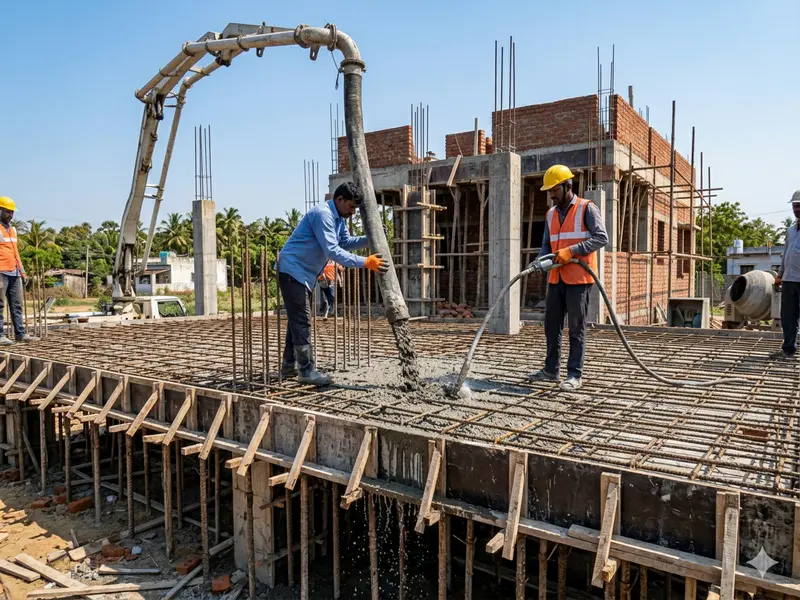
- What happens: A team of workers or a concrete pump line pours wet concrete continuously across the slab and beam grid. Mechanical vibrator needles are dipped into the wet mix to shake out trapped air pockets.
- Why it matters: A continuous, single-day pour ensures a monolithic, leak-proof, and solid concrete roof.
5. Water Curing (The Hardening Phase)
- What happens: Small clay or mud walls are built on the newly hardened roof slab to create shallow ponds, which are kept filled with water for a minimum of 7 to 14 days.
- Why it matters: Concrete does not dry to gain strength; it undergoes a chemical hydration process. If it lacks water during the first week, it will lose up to 50% of its design strength and develop thousands of tiny structural cracks.
6. Brick Masonry Work (Building the Walls)
- What happens: Once the concrete skeleton is fully cured and stable, masons use cement mortar to lay clay bricks, fly-ash bricks, or lightweight concrete blocks to build your exterior and interior partition walls.
- Why it matters: Walls create privacy, define your rooms, and protect your family from wind, rain, heat, and cold.
Phase 4: Utilities and Internal Finishes (The Skeleton Gets Skin)
With the structural shell fully protected under a concrete roof, the construction process moves entirely indoors. This phase focuses on installing basic utilities and smoothing out raw surfaces.
1. Plumbing and Electrical “Rough-Ins” (Conduits)
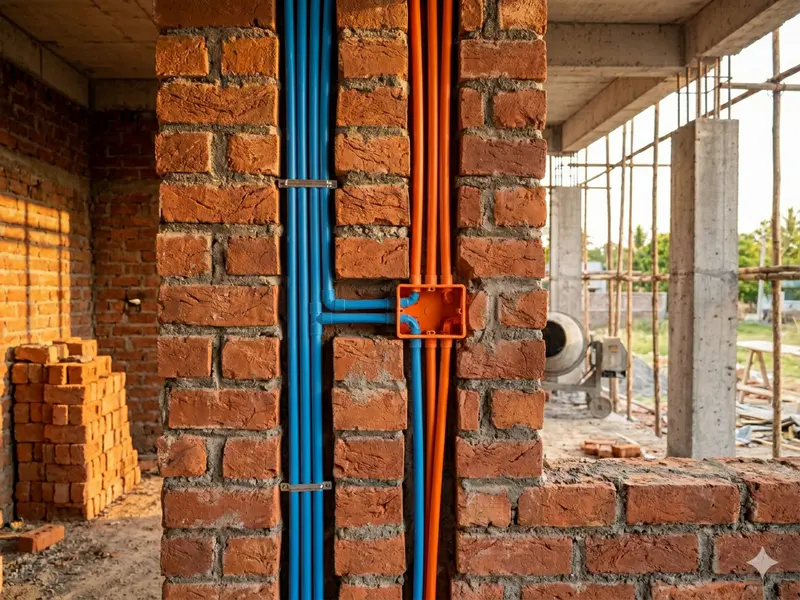
- What happens: Electricians and plumbers use mechanical wall-chasers to cut neat channels directly into the raw brick walls. They install hidden plastic conduit pipes, electrical switch boxes, and concealed water supply lines before any plastering happens.
- Why it matters: Running these lines early hides ugly wires and pipes inside the walls, keeping your finished home looking clean and modern.
2. Wall Plastering
- What happens: Masons apply a smooth, wet layer of cement and fine sand mortar across all internal and external brick walls, evening out any bumps or misalignments.
- Why it matters: Plastering seals the brick joints, prevents rainwater from seeping through the walls, and creates a perfectly flat surface for paint.
3. Flooring Installation
- What happens: A level bedding layer of lean concrete is laid on the floor. Workers then install your chosen flooring material—whether it is high-gloss vitrified tiles, natural granite, elegant marble, or warm wooden panels—across your rooms.
- Why it matters: Flooring takes the daily abuse of foot traffic, accents your interior design, and must be laid perfectly level to ensure water drains correctly in wet areas.
4. Fixing Door and Window Frames
- What happens: Sturdy wood, aluminum, or UPVC frames for doors and windows are anchored securely into the brick wall openings using heavy-duty hold-fast fasteners.
- Why it matters: These frames must be square and level so that your doors and windows swing open smoothly without jamming or scraping the floor.
Phase 5: Final Finishes and Handover (Turning a House into a Home)
This is the final stretch. Here, aesthetic detailing and operational testing take place, adding the personality that reflects your style.
- Wall Putty and Painting: Painters apply multiple coats of wall putty to fix minor plaster imperfections. This is followed by a protective base primer and at least two final coats of high-quality interior and exterior acrylic emulsion paints.
- Electrical and Plumbing Fittings: Electricians hook up your main breaker panel, decorative lights, ceiling fans, and smart switches. Plumbers install luxury fixtures like kitchen sinks, chrome faucets, rainfall showers, and bathroom toilets.
- Carpentry and Fixed Furniture: Modular kitchen cabinets, soft-close drawers, bedroom wardrobes, and decorative main doors are brought in and fitted by precision carpenters.
- Deep Cleaning, Inspection, and Handover: The site is thoroughly scrubbed to remove cement stains, paint drops, and fine dust. You conduct a final, thorough walkthrough with your contractor, check every tap and switch, and collect the keys to your new home!
Critical Material and Metric Conversions for House Owners
When tracking your construction progress or buying materials, your contractor might use traditional market terms, while your architectural drawings use metric units. Use this simple guide to understand the conversion numbers instantly.
| Market Unit | Structural Engineering Unit | How to Convert | Why You Need to Know This |
|---|---|---|---|
| Cubic Metres (cum) | Cubic Feet (CFT) | Multiply Cubic Metres by 35.314 | For verifying truckloads of sand or aggregate |
| Cubic Metres (cum) | Brass | Multiply Cubic Metres by 0.353 | Local contractors bill excavation and masonry by Brass |
| Kilograms (kg) | Metric Tons (MT) | Multiply Kilograms by 0.001 | Wholesale steel mills invoice rebar in Metric Tons |
| Kilograms (kg) | Quintals | Multiply Kilograms by 0.010 | Local retail steel shops quote prices per Quintal |
| Metres (m) | Feet (ft) | Multiply Metres by 3.280 | For double-checking plot boundaries and wall lengths |
| Inches (in) | Millimetres (mm) | Multiply Inches by 25.400 | For cross-checking rebar thickness or plywood sizes |
You can also calculate concrete quantities using our Concrete Calculator.
Three Non-Negotiable On-Site Rules for Every House Owner
You don’t need a civil engineering degree to keep your site running safely. Just remember and enforce these three golden rules during your weekly site visits:
Rule 1: Enforce the “Cover Block” Rule on Your Roof Slab
Before the concrete mixers start pouring your roof, walk onto the deck and look at the steel rebar mesh. The steel grid must not rest flat against the wooden shuttering boards. It must be raised slightly using small, pre-cast concrete squares called “cover blocks.” These blocks create a 20mm gap under the steel, allowing wet concrete to flow completely around the metal bars. If steel touches the wood, it will be exposed to air, rust away within a few seasons, and cause your roof to leak and fail.
Rule 2: Inspect Rebar Spacing with a Standard Tape Measure
During your quality inspection of rebar diameter and spacing before authorizing the concrete pour, do not guess with your eyes. Take a standard measuring tape and check the gap between the steel bars. If your design drawing states that bars should be spaced at 150mm center-to-center, ensure the gap stays close to that number. Contractors often try to widen the gaps to save money on steel, which can leave your slab weak and prone to sagging.
Rule 3: Physically Map Out Your Electrical Sockets on Raw Brick
Before your masons plaster the brick walls, grab a piece of chalk, walk into every room with your electrician, and physically draw your planned furniture layout on the raw walls. Mark exactly where your bed, bedside tables, TV console, refrigerator, and AC units will go. This allows you to place electrical socket conduits exactly where you need them. Modifying electrical lines after the walls are plastered requires breaking the fresh plaster, leaving permanent, ugly repair patches on your walls.
Frequently Asked Questions (FAQs)
1. Why is the quality inspection of rebar diameter and spacing before the concrete pour so critical?
Concrete is a permanent, non-transparent material that hardens within hours. Once it fills the formwork, your steel reinforcement is locked away forever. If the contractor installed the wrong bar diameter or skipped every second bar to save money, it becomes impossible to see or fix the mistake without tearing down the entire slab. This inspection is your final chance to guarantee the structural safety of your home.
2. How many days should the wooden shuttering supports remain under a roof slab?
For a standard residential roof slab with a span under 4.75 metres, the bottom vertical props and wooden shuttering sheets must remain securely in place for at least 14 continuous days. For larger spans, leave them for 21 days. Removing supports too early can cause the concrete to sag under its own weight, causing permanent structural damage.
3. What is the difference between a load-bearing structure and a framed structure?
In an old-school load-bearing structure, the heavy brick walls support the roof, meaning you cannot break or move any wall later without risking a collapse. In a modern framed structure, a strong framework of concrete columns and beams carries the roof weight, meaning your brick walls act merely as curtains. This allows you to safely break or alter internal walls whenever you want to remodel.
4. What happens if the contractor forgets to water-cure the concrete columns or slab?
If concrete is not water-cured, it dries out too fast, stopping the internal chemical crystallization process. The concrete will lose up to half its potential strength, turn brittle, and develop thousands of tiny hairline shrinkage cracks. This allows moisture to seep in, rust the internal steel, and significantly shorten the lifespan of your home.
5. Can I save money by skipping the plinth beam or damp-proof course (DPC)?
Absolutely not. Skipping the plinth beam can cause your columns to shift unevenly, leading to massive, unfixable cracks across your house. Skipping the DPC allows groundwater to rise into your walls through capillary action, which destroys your expensive interior paint, rots wooden wardrobes, and creates persistent, unhealthy mold.
Construction standards in India are regulated by the Bureau of Indian Standards (BIS).
Conclusion
Building your home step by step is a long journey that requires patience, financial discipline, and a commitment to quality. While it involves many moving parts, breaking the process down into distinct, logical phases makes it easy to understand and manage.
By keeping a close eye on critical stages—such as conducting a rigorous quality inspection of rebar diameter and spacing before authorizing the concrete pour and enforcing proper water curing—you can ensure your home remains safe and structurally sound. Choose experienced professionals, stay informed, and enjoy the rewarding process of watching your dream home rise from the ground up!
Shakeel T is a qualified Civil Engineer and Structural Consultant with extensive on-site experience in residential and commercial building construction. Specializing in material estimation, cost budgeting, and structural safety guidelines, he has successfully managed multiple real estate projects from foundation to finishing. Through this blog, Shakeel shares field-tested civil engineering thumb rules, IS Code practices, and practical site tips to help home builders execute their projects efficiently and within budget.
Education: Diploma in Civil Engineering
Expertise: Quantity Surveying, Material Estimation, Structural Design, and Site Management.