Introduction
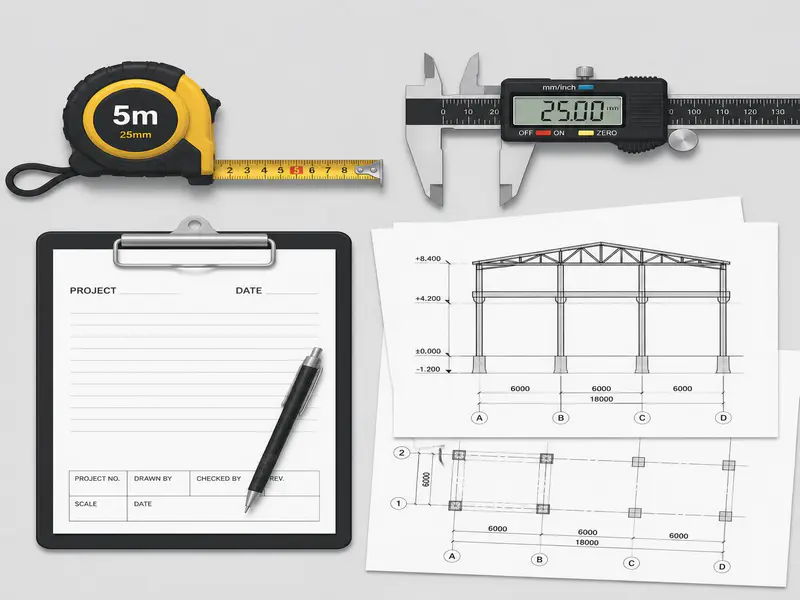
Accurate construction cost estimation relies entirely on a precise material list. A quantity takeoff (QTO) is the process of measuring and listing all materials required for a construction project by analyzing engineering and architectural drawings.
For beginners, a blueprint can look like a maze of lines and symbols. Missing a single dimension or misinterpreting a scale can lead to severe material shortages or expensive budget overruns. This comprehensive guide breaks down the Quantity Takeoff from Drawings Step by Step, actionable phases, complete with real-world mathematical examples, unit conversions, and site-tested quality control checks.

What is Quantity Takeoff and Why Does It Matter?
A quantity takeoff represents the foundation of procurement, budgeting, and scheduling. It bridges the gap between a designer’s vision and the physical reality of a construction site.
- Cost Estimation: Contractors use takeoffs to apply unit labor and material prices to calculate the total bid price.
- Procurement Planning: Takeoffs prevent project delays by ensuring materials are ordered well in advance.
- Wastage Mitigation: Accurate calculations reduce environmental and financial waste on-site.
An estimator must understand three primary types of quantities during a takeoff:
- Net Quantity: The exact volume or area calculated directly from the dimensions on the drawing.
- Gross Quantity: The net quantity plus an additional realistic allowance for material waste, scrap, and handling losses.
- Invoice Quantity: The final quantity ordered from suppliers, which often rounds up to commercial packaging units (e.g., full bags of cement or whole truckloads of aggregate).
Standard Measurement Units in Construction
Before touching a calculator, you must understand the industry-standard measurement units used across global projects. Different materials require different dimensional tracking.
| Material / Work Item | Metric Unit | Imperial Unit | Measurement Type |
|---|---|---|---|
| Earthwork / Excavation | Cubic Meter (cum) | Cubic Yard (cu yd) / CFT | Volume |
| Concrete (Foundations, Slabs) | Cubic Meter (cum) | Cubic Yard (cu yd) / CFT | Volume |
| Brickwork / Blockwork | Cubic Meter (cum) | Cubic Foot (CFT) | Volume |
| Plastering / Painting / Tiling | Square Meter (sqm) | Square Foot (sqft) | Area |
| Steel Reinforcement (Rebar) | Kilogram (kg) / Tonne | Pound (lb) / US Ton | Weight |
| Roofing Sheet / Membrane | Square Meter (sqm) | Square Foot (sqft) | Area |
| Skirting / Pipes / Conduit | Running Meter (rm) | Linear Foot (LFT) | Linear Length |
| Doors, Windows, Sanity Fixtures | Numbers (Nos) | Each (Ea) | Count |
The Core Mathematical Formulas for Quantity Takeoff
Every physical structure can be broken down into simple geometric shapes. You do not need complex calculus for a quantity takeoff; you only need to master these core plain-text algebraic formulas.
Excavation and Concrete Volume (Cuboids)
- Formula: Volume = Length x Width x Thickness (or Depth)
- Application: Used for strip footings, isolated pads, beams, columns, and floor slabs.
Sloped Footings (Frustum of a Pyramid)
- Formula: Volume = (Depth / 3) x (Area 1 + Area 2 + Square Root of (Area 1 x Area 2))
- Where Area 1 is the bottom base area and Area 2 is the top concrete base area.
Wall Openings and Deductions
- Formula: Net Volume = Total Gross Volume – Deduction Volume (Doors + Windows + Lintels)
Brickwork Volume
- Formula: Number of Bricks = (Volume of Brickwork / Volume of One Brick with Mortar)
Circular Columns or Piles (Cylinders)
- Formula: Volume = 3.1416 x Radius x Radius x Height
- Alternatively: Volume = 0.7854 x Diameter x Diameter x Height
Step-by-Step Guide to Quantity Takeoff from Drawings
Follow this systematic operational framework on every project to prevent data omissions and errors.
[Step 1: Document Review] ➔ [Step 2: Scale Verification] ➔ [Step 3: Excavation / Foundation]
                                                                         │
[Step 7: Compiling Bill] ⬅ [Step 6: Finishings Takeoff] ⬅ [Step 4 & 5: Superstructure & Rebar]

Step 1: Document Review and Blueprint Reading
Never jump straight into measuring. Spend time studying the drawing index, general notes, specifications, and symbols legend. Look for discrepancies between architectural plans (which show finishes) and structural plans (which show load-bearing elements). Structural drawings always take precedence for structural quantities.
Step 2: Establish Scales and Takeoff Order
Verify the scale listed in the title block. On printed drawings, check it manually with an architect’s or engineer’s scale rule. If using digital takeoff software, calibrate your workspace using a known dimension, such as a designated gridline distance. Always complete your takeoff in structural chronological order: Earthwork ➔ Foundation ➔ Plastering ➔ Painting.
Step 3: Foundation and Earthwork Takeoff
Identify the excavation limits. Excavation must extend slightly beyond the concrete footing width to allow workers space to install formwork. This extra space is called the working space clearance.
Step 4: Superstructure Takeoff (Columns, Beams, Slabs)
Track structural loads upward. Measure columns from the top of the foundation pad to the underside of the first-floor beam. Measure beams from inside-face to inside-face of columns to prevent double-counting structural intersections.
Step 5: Reinforcement Steel (Rebar) Takeoff
Rebar cannot be measured simply by volume. You must determine total linear lengths per diameter bar size, account for lap lengths (where two bars overlap), hooks, and bends, and convert those lengths to weight.
Step 6: Finishing and Drywall Takeoff
Finishes are calculated by surface area. For flooring, calculate the net internal room area. For wall plastering and painting, calculate the perimeter of the room multiplied by the clear ceiling height, then deduct major openings like doors and windows.
Step 7: Compiling the Bill of Quantities (BOQ)
Transfer your structural measurements into a structured master spreadsheet. Group items by operational trade categories to create a clear Bill of Quantities.
You can also calculate concrete quantities using our tool Concrete Calculator.
For detailed reinforcement calculation, read our guide on Steel Weight Calculation for Slab.
Practical Structural Examples with Step-by-Step Calculations
Let’s work through three detailed, real-world calculation scenarios using standard concrete dimensions.
Scenario A: Excavation and Concrete for an Isolated Footing
Suppose your structural drawing specifies an isolated RC footing with the following dimensions:
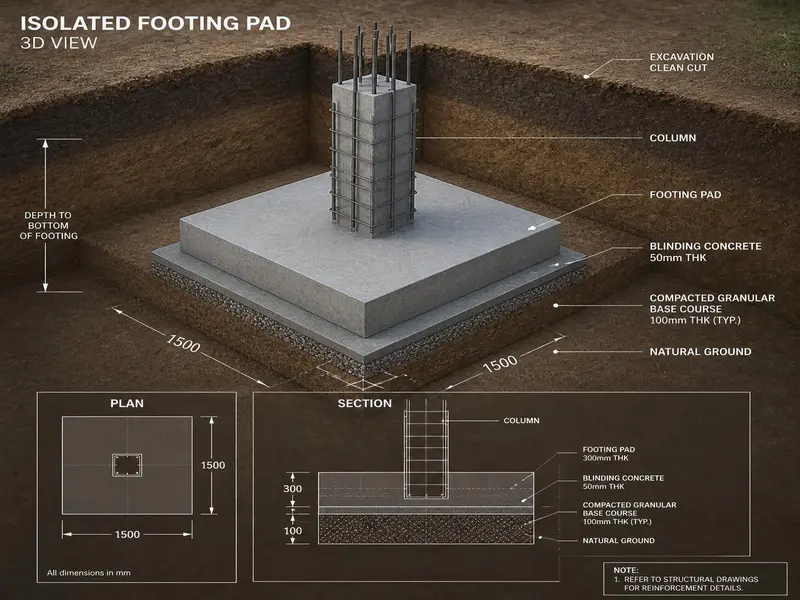
- Footing Concrete Size: Length = 1.8 meters, Width = 1.8 meters, Thickness = 0.4 meters.
- Excavation Depth: 1.5 meters from ground level.
- Working Space Allowance: Add 0.3 meters on all four sides of the footing for formwork installation.
1. Excavation Quantity Calculation
First, calculate the adjusted excavation plan dimensions by adding the working space to both sides:
- Excavation Length = 1.8m + 0.3m + 0.3m = 2.4 meters
- Excavation Width = 1.8m + 0.3m + 0.3m = 2.4 meters
- Excavation Depth = 1.5 meters
- Calculation: Excavation Volume = 2.4m x 2.4m x 1.5m
- Result: Total Excavation Quantity = 8.64 Cubic Meters
2. Plain Cement Concrete (PCC) Mud Mat Calculation
A 0.1-meter-thick lean concrete leveling layer is placed underneath the footing, extending 0.1 meters past the footing edge:
- PCC Length = 1.8m + 0.1m + 0.1m = 2.0 meters
- PCC Width = 1.8m + 0.1m + 0.1m = 2.0 meters
- PCC Thickness = 0.1 meter
- Calculation: PCC Volume = 2.0m x 2.0m x 0.1m
- Result: Total PCC Quantity = 0.40 Cubic Meters
3. Reinforced Cement Concrete (RCC) Footing Calculation
Calculate the net structural volume of the base pad:
- Footing Length = 1.8 meters
- Footing Width = 1.8 meters
- Footing Thickness = 0.4 meters
- Calculation: RCC Volume = 1.8m x 1.8m x 0.4m
- Result: Total Footing Concrete Volume = 1.296 Cubic Meters
Scenario B: Brickwork Volume with Openings and Deductions
Calculate the structural brickwork quantity for a perimeter room wall:
- Wall Dimensions: Length = 6.0 meters, Height = 3.0 meters, Thickness = 0.23 meters.
- Door Cutout: 1.0 meter wide by 2.1 meters high.
- Window Cutout: 1.2 meters wide by 1.2 meters high.
- Concrete Lintel Beam: Runs over both openings, total embedded volume measured at 0.12 cubic meters.
1. Gross Brickwork Volume
- Calculation: Gross Volume = 6.0m x 3.0m x 0.23m = 4.14 Cubic Meters
2. Opening Deductions
- Door Opening Deduction = 1.0m x 2.1m x 0.23m = 0.483 Cubic Meters
- Window Opening Deduction = 1.2m x 1.2m x 0.23m = 0.331 Cubic Meters
- Lintel Concrete Deduction = 0.120 Cubic Meters
- Total Deductions = 0.483 + 0.331 + 0.120 = 0.934 Cubic Meters
3. Net Brickwork Volume
- Calculation: Net Volume = Gross Volume – Total Deductions
- Calculation: Net Volume = 4.14 – 0.934
- Result: Net Brickwork Quantity = 3.206 Cubic Meters
Scenario C: Reinforcement Steel (Rebar) Weight Takeoff

Calculate the total weight of rebar needed for a concrete beam reinforcement setup:
- Total calculated linear run of 12mm diameter rebar (including hooks and laps) = 145 meters.
- Total calculated linear run of 8mm diameter stirrup rebar = 210 meters.
1. Rebar Unit Weight Formula
The standard plain-text weight formula derived from steel density is:
- Unit Weight (kg per meter) = (Diameter x Diameter) / 162
2. Weight Calculation for 12mm Rebar
- Unit Weight = (12 x 12) / 162 = 144 / 162 = 0.889 kg/m
- Total Weight = 145 meters x 0.889 kg/m
- Result: 12mm Rebar Weight = 128.91 kg
3. Weight Calculation for 8mm Rebar
- Unit Weight = (8 x 8) / 162 = 64 / 162 = 0.395 kg/m
- Total Weight = 210 meters x 0.395 kg/m
- Result: 8mm Rebar Weight = 82.95 kg
Mastering Essential Unit Conversions
Civil engineers frequently have to convert metric drawings to regional commercial units. Use these exact structural multipliers for your conversions.
Volume Conversions
- Cubic Meters to Cubic Feet (CFT): Multiply Cubic Meters by 35.3147
- Example: 5 cum x 35.3147 = 176.57 CFT
- Cubic Meters to Brass: Multiply Cubic Meters by 0.3531 (Note: 1 Brass = 100 Cubic Feet)
- Example: 20 cum x 0.3531 = 7.06 Brass
- Cubic Yards to Cubic Meters: Multiply Cubic Yards by 0.7645
Area Conversions
- Square Meters to Square Feet (sqft): Multiply Square Meters by 10.7639
- Square Feet to Square Meters: Multiply Square Feet by 0.0929
Weight Conversions
- Kilograms to Metric Tonnes: Divide Kilograms by 1000
- Kilograms to Pounds (lbs): Multiply Kilograms by 2.2046
Site Quality Controls, Waste Factors, and Field Tips

Calculating net drawing sizes is only half the battle. On-site material handling, cutting, and placement errors require realistic wastage factors.
Industry-Standard Material Wastage Coefficients
Add these percentages to your net structural values before submitting orders:
- Structural Concrete: Add 2% to 5% (to account for spillage, over-excavation, and formwork deflection).
- Reinforcement Steel: Add 5% to 8% (to account for cut-off scrap rebar ends and rolling margins).
- Bricks and Blocks: Add 5% to 10% (to account for breakage during transit and unloading).
- Ceramic Wall & Floor Tiles: Add 8% to 12% (to account for complex perimeter cutting and corner trimming).
Professional Site Tips for Estimators
- Beware of the Clear Span Trap: When counting stirrups or ties in beams and columns, always divide the clear structural length by the spacing distance, then add 1 for the starter stirrup. Formula: Number of Stirrups = (Clear Span / Spacing) + 1.
- Verify Concrete Cover Deductions: Never calculate structural rebar length using the outer dimensions of a concrete beam. Always deduct the structural concrete cover (typically 25mm to 40mm) from all sides to ensure the steel fits inside the formwork.
- Cross-Check with Soil Reports: Excavation quantities change based on the angle of repose. Sandy soils require sloping or shoring, which increases excavation quantities compared to stiff clay.
Frequently Asked Questions (FAQs)
What is the difference between Quantity Takeoff (QTO) and a Bill of Quantities (BOQ)?
A Quantity Takeoff is the process of measuring and extracting material quantities directly from architectural or structural blueprints. A Bill of Quantities (BOQ) is the formal, itemized statement that compiles those quantities alongside item descriptions and unit rates to estimate total project costs.
How do you handle overlapping quantities in beams and columns?
To avoid double-counting concrete volumes, follow a strict hierarchy: measure columns continuously from floor level to floor level. Then, measure beam lengths between the inside faces of those columns.
What is the centerline method in quantity takeoff?
The centerline method is a technique used for continuous walls. It calculates the total running perimeter centerline length of a structure and multiplies it by the wall thickness and height. This provides the total volume in a single calculation while automatically accounting for corner overlaps.
Why do we add 1 when calculating the number of stirrups?
We add 1 because the division of length by spacing only calculates the number of spaces between stirrups. An additional starter stirrup is required at the zero-point boundary to support the rebar cage.
Can software completely replace manual quantity takeoffs?
No. Software like Bluebeam, Planswift, or Autodesk Takeoff speeds up the scaling and measurement process, but it cannot interpret ambiguous notes or catch conflicting details between drawings. A skilled estimator must verify the software’s inputs and logic.
Construction estimation methods often follow standards published by the Bureau of Indian Standards (BIS).
Quantity surveying practices are also explained by professional organizations like the Royal Institution of Chartered Surveyors (RICS).
Conclusion
Mastering quantity takeoffs requires a mix of geometric math, attention to detail, and practical knowledge of construction workflows. By using a systematic approach—verifying drawing scales, breaking components down into basic shapes, and applying realistic site wastage factors—you can produce professional, reliable estimates. Use this step-by-step guide as a baseline reference on your next project to keep your budgets accurate and your construction site running smoothly.
Shakeel T is a qualified Civil Engineer and Structural Consultant with extensive on-site experience in residential and commercial building construction. Specializing in material estimation, cost budgeting, and structural safety guidelines, he has successfully managed multiple real estate projects from foundation to finishing. Through this blog, Shakeel shares field-tested civil engineering thumb rules, IS Code practices, and practical site tips to help home builders execute their projects efficiently and within budget.
Education: Diploma in Civil Engineering
Expertise: Quantity Surveying, Material Estimation, Structural Design, and Site Management.