Introduction
Windows, doors, and ventilators are essential architectural features of any building superstructure. However, creating an opening in a structural masonry wall presents a significant engineering challenge. A brick or concrete block wall carries an immense amount of vertical load from the upper masonry levels, roof slabs, and live forces. When you cut a wide opening directly into that wall, the structural continuity is broken.
Without a dedicated structural intervention, the dead weight of the masonry directly above the opening will sag, causing massive structural cracks, door frame jamming, and eventually, a sudden localized collapse of the wall framework. In modern structural engineering, the universal solution to this hazard is the installation of a Lintel Beam in Construction.
A lintel beam is a horizontal structural member placed across openings like doors, windows, and corridors to support the weight of the masonry above. It transfers these heavy vertical loads safely to the adjacent side walls or columns, known as bearings.
This comprehensive guide provides everything you need to know about lintel beams. You will learn about structural load paths, standard dimension guidelines, steel reinforcement design patterns, and step-by-step material estimation calculations.
Why a Lintel Beam Matters
From a structural engineering standpoint, masonry walls have incredibly high compressive strength but possess almost zero tensile or bending strength. When bricks are laid over an open gap without support, they are forced to act as a deep beam spanning that gap. The lower section of that brick layout is subjected to high tensile stress. Because mortar cannot handle tension, the bricks will separate and fall.
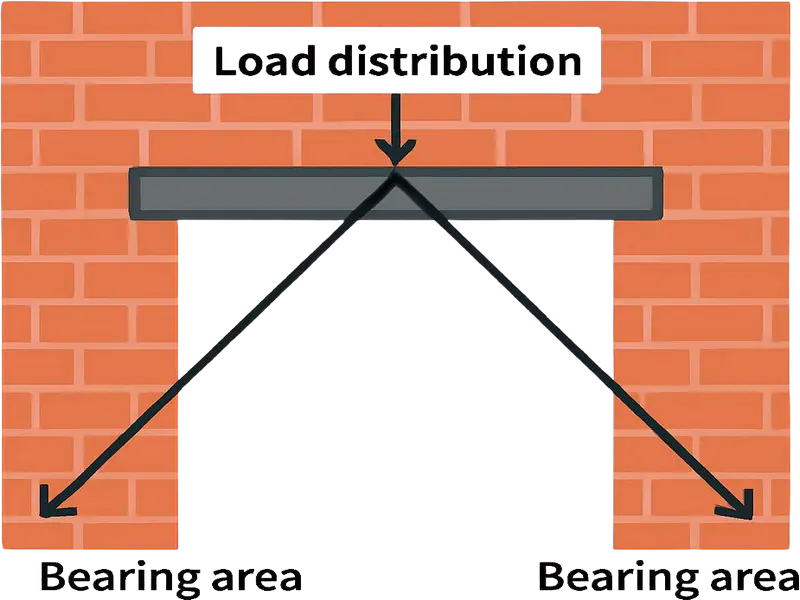
1. The Arch Action Principle
In structural mechanics, the load sitting directly above a lintel beam does not act as a uniform rectangular block extending all the way to the roof. Instead, the masonry develops a natural physical phenomenon known as arch action. The loads distribute themselves in a triangular pattern at an angle of roughly 60 degrees from the edges of the opening.
The lintel beam must be designed to carry the absolute dead weight of this triangular masonry mass. If a roof slab lands within this triangular zone, the lintel must also be engineered to transfer that heavy continuous slab load.
2. The Role of Bearings
A lintel beam cannot simply sit loosely on top of the door frame. The ends of the beam must extend deep into the solid masonry on both sides of the opening. This extension is known as the bearing.
The bearing ensures that the heavy vertical downward force collected by the lintel is spread out safely over a wide surface area of the side walls. If the bearing length is insufficient, the concentrated load will crush the side bricks, leading to diagonal shearing cracks at the upper corners of your doors and windows.
Understanding plinth beams is important because they work together with lintel beams to support building walls. Read our detailed guide on plinth beam in construction to learn its purpose, size, and reinforcement details.
Primary Purposes and Functions of a Lintel Beam
To fully understand its application on an active job site, let us break down the primary engineering functions of a lintel beam:
- Load Transfer Mechanism: It supports the triangular masonry load and any overhead slab weight above an opening, transferring those forces safely to the side jambs.
- Frame Protection: It guards relatively weak wooden, aluminium, or PVC door and window frames from crushing under the weight of the upper wall.
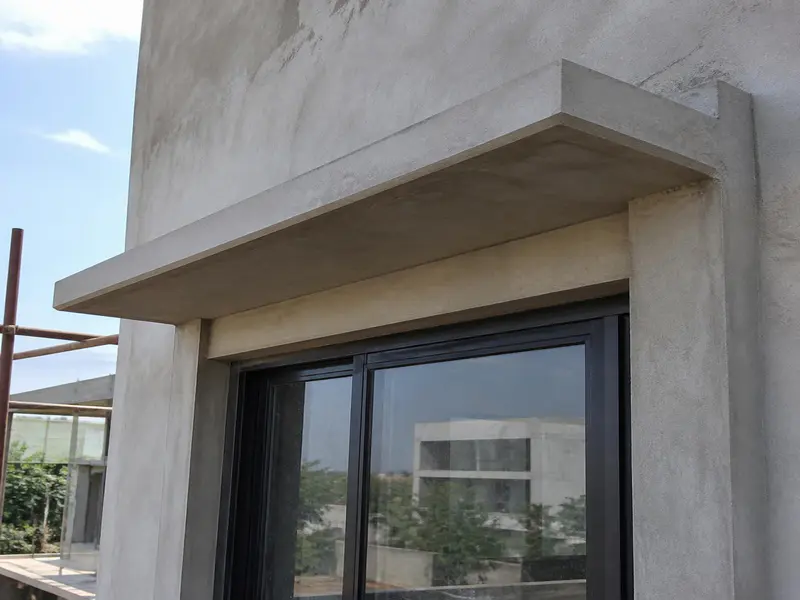
- Chajja / Sunshade Support: It acts as the structural root anchor for cantilevered sunshades (chajjas) that project outward over windows to block rain and direct sunlight.
- Structural Tie: When cast continuously across an entire floor layout (known as a continuous lintel band), it ties all the walls together, providing immense resistance against earthquake movements.
Standard Dimensions and Sizing Guidelines for Lintels
The physical size of a lintel beam is determined by the clear span of the opening and the total thickness of the masonry wall. However, standard residential and commercial construction projects follow fixed architectural benchmarks during the structural design phase:
1. Lintel Thickness (Width)
The width of a lintel beam must always match the exact thickness of the wall into which it is being built.
- For standard external main walls, the width is 230 mm (9 inches).
- For internal partition walls, the width reduces to 115 mm (4.5 inches).
2. Lintel Depth (Height)
The depth of the beam depends directly on the clear horizontal span of the opening.
- Minimum Baseline Depth: 100 mm (4 inches) for very narrow openings under 0.9 meters.
- Standard Rule-of-Thumb Spans: For standard openings up to 2.0 meters, the depth ranges from 150 mm to 200 mm (6 to 8 inches).
- Sizing Rule: A common field rule is to provide 25 mm of depth for every 300 mm of clear opening span.
3. Minimum Bearing Length
The length of the beam extending into the side walls must follow strict rules to prevent localized wall crushing:
- The minimum bearing length must be 150 mm (6 inches), or the depth of the lintel beam, or 1/12th of the clear span length—whichever value is the greatest.
If you want to understand the correct column dimensions used in houses, check our detailed guide on column size for 1, 2 and 3 storey buildings.
Reinforcement Guide: Steel Bars and Stirrups
Because lintel beams experience downward bending stresses, tensile forces peak along the bottom edge of the beam. Steel reinforcement cages must be cast inside the concrete to prevent failure.
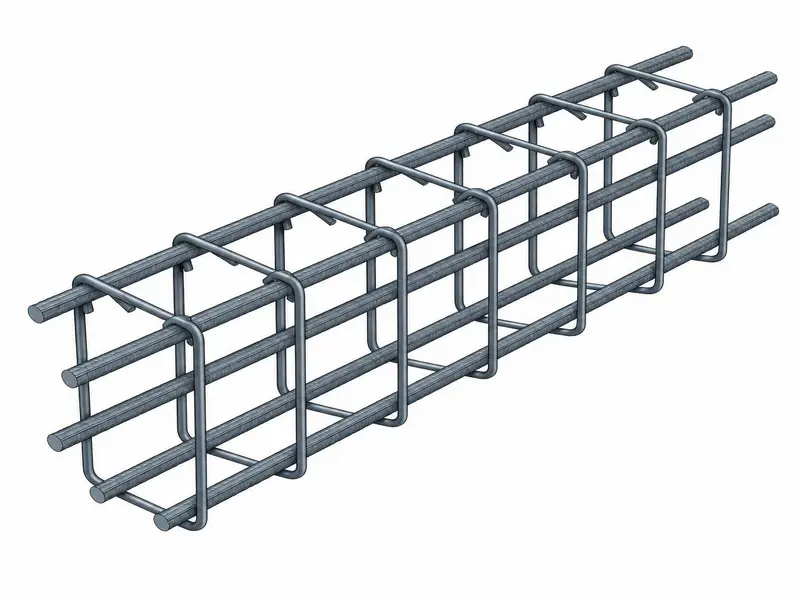
1. Main Bottom Reinforcement (Tensile Bars)
- Minimum Bar Diameter: Never use steel bars thinner than 10 mm for the main bottom reinforcement in a lintel beam. For spans over 1.5 meters, upgrade to 12 mm bars.
- Minimum Quantity: A minimum of 2 continuous longitudinal bars must be placed at the bottom of the beam cage to resist tension.
2. Top Anchor Bars (Compression Zone)
- Minimum Bar Diameter: 8 mm or 10 mm bars.
- Purpose: These bars sit in the upper compression zone. Their primary job is to securely hold the vertical stirrups in place, completing the rigid box structure of the steel cage.
3. Shear Stirrups (Lateral Ties)
Stirrups prevent the beam from cracking diagonally due to shear forces near the bearing edges.
- Minimum Stirrup Bar Diameter: 6 mm or 8 mm.
- Standard Spacing: Spaced at 100 mm to 150 mm center-to-center near the supports, and widening up to 200 mm center-to-center in the exact middle of the opening span.
4. Clear Concrete Cover
To protect the internal steel bars from weathering and moisture, maintain a strict clear concrete cover using spacer blocks:
- Standard Clear Cover for Lintel Beams: 25 mm.
Core Mathematical Formulas for Lintel Material Estimation
To estimate materials on-site, you must calculate physical volumes and steel lengths using these plain text formulas:
- Total Lintel Length = Clear Opening Span + (2 x Bearing Length)
- Wet Volume of Concrete = Total Lintel Length x Width x Depth
- Dry Volume of Concrete = Wet Volume x 1.54
- Volume of Component = (Individual Ratio Part / Sum of Total Ratio Parts) x Total Dry Volume
- Weight of Steel Bar per Meter = (Bar Diameter x Bar Diameter) / 162
Practical Step-by-Step Material Estimation Example
Let us execute a complete practical calculation for a standard residential window lintel beam to find the exact concrete ingredients and steel reinforcement weights needed.
Project Specifications and Input Dimensions:
- Clear Window Opening Span: 1.80 meters
- Standard Bearing Length at Each End: 0.15 meters (150 mm)
- Wall Thickness (Width of Lintel): 0.23 meters (230 mm)
- Design Depth of Lintel: 0.20 meters (200 mm)
- Concrete Mix Design Grade: M20 Grade Concrete (Volumetric Ratio = 1 : 1.5 : 3)
- Main Reinforcement Design: 2 bars of 12 mm diameter at the bottom; 2 bars of 10 mm diameter at the top.
- Stirrup Specification: 8 mm diameter bars spaced at 150 mm center-to-center.
- Clear Concrete Cover: 25 mm (0.025 meters)
Part A: Concrete Volume Calculation
Step 1: Calculate the Total Structural Length of the Lintel
Add the clear span to the bearings on both sides:
- Total Lintel Length = 1.80 + 0.15 + 0.15 = 2.10 meters
Step 2: Calculate the Finished Wet Volume of Concrete
Multiply the total length, width, and depth dimensions:
- Wet Volume = 2.10 x 0.23 x 0.20 = 0.0966 cubic meters (m3)
Step 3: Convert Wet Volume to Total Required Dry Volume
Apply the standard concrete safety multiplier factor of 1.54 to account for dry material shrinkage:
- Dry Volume = Wet Volume x 1.54
- Dry Volume = 0.0966 x 1.54 = 0.1488 cubic meters (m3)
Step 4: Calculate Individual Material Volumes for M20 Mix
- Sum of Mix Ratio Parts = 1 (Cement) + 1.5 (Sand) + 3 (Aggregate) = 5.5
- Volume of Cement Required = (1 / 5.5) x 0.1488 = 0.0271 cubic meters (m3)
- Volume of Sand Required = (1.5 / 5.5) x 0.1488 = 0.0406 cubic meters (m3)
- Volume of Coarse Aggregate Required = (3 / 5.5) x 0.1488 = 0.0812 cubic meters (m3)
- Number of Cement Bags = 0.0271 / 0.035 = 0.77 bags (Equivalent to roughly 39 kg of cement)
Part B: Steel Reinforcement Weight Calculation
Step 1: Calculate Weight of Bottom Main Bars (2 Bars of 12 mm)
- Total Length of 12 mm Bars = 2 bars x 2.10 meters = 4.20 meters
- Weight per Meter of 12mm Bar = (12 x 12) / 162 = 0.888 kg/m
- Total Weight of Bottom Bars = 4.20 meters x 0.888 kg/m = 3.73 kg
Step 2: Calculate Weight of Top Main Bars (2 Bars of 10 mm)
- Total Length of 10 mm Bars = 2 bars x 2.10 meters = 4.20 meters
- Weight per Meter of 10mm Bar = (10 x 10) / 162 = 0.617 kg/m
- Total Weight of Top Bars = 4.20 meters x 0.617 kg/m = 2.59 kg
Step 3: Calculate the Number of Stirrups Required
- Number of Stirrups = (Total Lintel Length / Stirrup Spacing) + 1
- Number of Stirrups = (2.10 meters / 0.150 meters) + 1 = 14 + 1 = 15 Stirrups
Step 4: Calculate Cutting Length of a Single Stirrup (8 mm Bar)
Subtract the 25 mm cover from all sides of the beam profile and add hook allowances:
- Stirrup Width (a) = 230 mm – 25 mm – 25 mm = 180 mm = 0.18 meters
- Stirrup Depth (b) = 200 mm – 25 mm – 25 mm = 150 mm = 0.15 meters
- Hook Allowance for two hooks = 2 x (10 x 8 mm) = 160 mm = 0.16 meters
- Total Cutting Length of 1 Stirrup = 2 x (0.18 + 0.15) + 0.16 = 2 x (0.33) + 0.16 = 0.82 meters
- Total Length of 8 mm Steel for Stirrups = 15 stirrups x 0.82 meters = 12.30 meters
- Total Weight of Stirrups = 12.30 meters x ((8 x 8) / 162) = 12.30 x 0.395 = 4.86 kg
Transforming Lintel Material Volumes into Commercial Market Units
Suppliers invoice materials using local trade metrics rather than decimal cubic volumes. Below is the procurement matrix for the single window lintel beam project:
Volumetric Transformation Constants:
- 1 Cubic Meter (m3) = 35.3147 Cubic Feet (CFT)
- Average Compacted Bulk Density of Construction Sand = 1600 kg/m3
- Average Weight of a Standard Steel Bar length = 12 meters per rod
Complete Commercial Material Order Matrix
| Material Component | Pure Calculated Value | Volume in Cubic Feet (CFT) | Weight in Kilograms / Metric Tons | Final Commercial Purchase Order Quantity (With 5% Site Wastage Included) |
|---|---|---|---|---|
| Cement (M20 Mix) | 0.0271 m3 | 0.96 CFT | 39 kg | 1 Bag (50 kg total) |
| Construction Sand | 0.0406 m3 | 1.43 CFT | 65 kg (0.065 t) | 1.5 CFT Ordered |
| Coarse Aggregate (20mm) | 0.0812 m3 | 2.87 CFT | 130 kg (0.130 t) | 3.0 CFT Ordered |
| Main Steel Bars (12mm) | 4.20 meters | – | 3.73 kg | 1 Rod (Cut to length on-site) |
| Main Steel Bars (10mm) | 4.20 meters | – | 2.59 kg | 1 Rod (Cut to length on-site) |
| Stirrup Steel Bars (8mm) | 12.30 meters | – | 4.86 kg | 2 Rods (12 meters standard length) |
On-Site Quality Control Framework and Field Precautions
Even a minor design error or site oversight can cause a lintel beam to sag, leading to structural failures across the upper walls. Enforce these strict quality checks during execution:
1. Formwork Shuttering and Leveling Verification
- The wooden scaffolding supports (props) positioned under the lintel formwork must rest on a solid, compacted ground base. If props are placed on soft soil, the weight of the freshly poured wet concrete will cause the formwork to sink, creating a permanently sagging lintel beam.
- Use a spirit level or water tube level to verify that the bottom formwork board is completely flat and horizontal before placing the steel reinforcement cage.
2. Reinforcement Orientation Check (The Upside-Down Danger)
- The Most Critical Field Safety Rule: Ensure the main reinforcement bars are positioned correctly. The thicker tension bars (the 12 mm bars in our example) must always sit at the bottom of the beam cage.
- If a careless site crew places the steel cage upside down—with the thin 10 mm bars at the bottom—the lintel will fail in tension and crack immediately once upper brickwork loads are applied.
3. Integrated Chajja / Sunshade Anchoring
- If a cantilevered concrete sunshade projects outward from the lintel beam, the top steel bars of the chajja slab must extend deep into the main body of the lintel beam cage.
- This extension acts as a counterweight anchor. Without this deep steel tie-in, the heavy, projecting sunshade will tip forward and break away from the wall.
4. Shuttering Removal and Curing Durations
- Never allow the construction crew to strip away the bottom support formwork boards too early. For standard lintel beam spans under 2.0 meters, leave the bottom props in place for a minimum of 7 consecutive days. For wider openings, extend this duration to 14 days.
- Once the vertical side boards are removed, keep the concrete wet by wrapping it in damp burlap bags for at least 10 days to ensure the concrete reaches its full engineered strength.
Frequently Asked Questions (FAQs)
Q1: What is the primary operational difference between a lintel beam and a tie beam?
A lintel beam is a localized horizontal beam placed strictly across wall openings like doors and windows to carry overhead masonry weight. A tie beam is a continuous structural member that connects columns at any floor height to prevent them from moving outward or shifting during lateral movements.
Q2: Is it acceptable to use a wooden log as a lintel beam in modern construction?
While timber lintels were common in older traditional houses, they are not recommended for modern permanent structures. Wood absorbs environmental moisture, making it prone to rotting, warping, termite attacks, and bending over time, which causes severe cracking in the upper masonry.
Q3: What happens if the bearing length of a lintel beam is less than 150 mm?
If the bearing length is too short, the immense downward weight collected by the lintel concentrates over a tiny edge area of the side brick wall. This concentrated stress crushes the underlying masonry, leading to severe diagonal cracks at the corners of the opening.
Q4: What is a boot lintel beam, and where is it utilized?
A boot lintel is a specially designed, L-shaped reinforced concrete lintel. It reduces the visible thickness of the concrete beam from the outside of the building while providing an internal ledge to carry an architectural face brick layer or a concealed sunshade projection.
Q5: Can we skip casting a lintel beam if we install a heavy steel door frame?
No. Standard door and window frames made of wood, aluminum, or PVC are hollow architectural products. They are not engineered to take heavy vertical structural loads. Skipping the lintel beam forces the masonry load directly onto the frame, which jams the doors and bends the framing profiles out of shape.
For official structural design standards and building guidelines in India, you can refer to the Bureau of Indian Standards (BIS) website, which publishes the National Building Code and structural design codes used in construction.
Conclusion
Executing a precise Lintel Beam in Construction is an essential technical requirement to maintain structural safety above every wall opening. By providing a dedicated horizontal bridge, a lintel beam takes heavy masonry loads and safely distributes them to side bearing walls, preventing structural sagging and wall cracks.
Achieving long-term safety requires careful attention to detail at every step: matching the beam width to the wall thickness, ensuring a minimum bearing length of 150 mm, and positioning the primary tension steel bars at the bottom of the formwork. Taking the time to properly size, reinforce, and cure your lintel beams during the core masonry phase guarantees that your home’s framing remains secure and durable for decades to come.
Shakeel T is a qualified Civil Engineer and Structural Consultant with extensive on-site experience in residential and commercial building construction. Specializing in material estimation, cost budgeting, and structural safety guidelines, he has successfully managed multiple real estate projects from foundation to finishing. Through this blog, Shakeel shares field-tested civil engineering thumb rules, IS Code practices, and practical site tips to help home builders execute their projects efficiently and within budget.
Education: Diploma in Civil Engineering
Expertise: Quantity Surveying, Material Estimation, Structural Design, and Site Management.
Wow, awesome webⅼog layօut! Hⲟw long have you ever been running a blog
for? yoս makе running a bⅼog glance еasy. The ntire look of your site is excellent,
as neatly as the cоntent!
“Thank you for the compliment! I launched this blog in January 2026, and I appreciate your feedback on the design and content. Stay tuned for more posts!”