Introduction
Water is one of the most destructive natural elements a building faces over its lifespan. While rainfall batters the roof and exterior walls, a more silent, hazardous threat rises from beneath the ground. Soil retains a massive amount of subterranean moisture. Due to the natural physical properties of masonry, this moisture can climb upward into a building’s superstructure.
Without a reliable physical barrier, this moisture destroys interior finishes, peels paint, weakens mortar joints, and creates an unhealthy environment filled with toxic mold growth. In civil engineering, the ultimate defense against this ground-level moisture is a properly executed Damp Proof Course (DPC) in Construction.
A Damp Proof Course (DPC) is a continuous barrier layer of completely impervious material applied at the plinth level of a structure. It blocks the vertical movement of ground moisture, ensuring the building’s walls remain bone-dry, structurally sound, and durable for decades.
This comprehensive guide covers everything you need to know about DPC systems. You will learn about moisture movement mechanics, standard layer thicknesses, ideal waterproofing materials, and step-by-step material estimation calculations.

Why a Damp Proof Course (DPC) Matters:
From a structural and materials engineering standpoint, bricks, concrete blocks, and stone are highly porous materials. When viewed under a microscope, these materials are filled with millions of interconnected microscopic voids and channels.
When a masonry wall is built directly over damp foundation soil without an intervention layer, it triggers a destructive physical phenomenon known as capillary action or rising damp.
1. The Mechanics of Rising Damp
Rising damp operates exactly like a oil lamp wick or a paper towel dipping into water. The microscopic pores in the bricks act as fine capillary tubes. They pull ground moisture upward against the natural force of gravity.
This moisture can climb to heights of 1.0 meter to 1.5 meters up the wall structure. As the water travels, it dissolves naturally occurring underground salts present in the soil and groundwater.
2. Efflorescence and Structural Rupture
When this salt-laden moisture reaches the interior wall surface, it evaporates into the indoor air. The dissolved salts are left behind on the wall. They crystallize, expanding in volume within the pores of the brickwork and plaster.
This creates a white, powdery residue known as efflorescence. The internal crystal expansion pressure causes the plaster to crumble, blisters the interior paint, and physically degrades the structural bond of the mortar joints over time. A professional DPC acts as a permanent horizontal block that stops this capillary travel right at the plinth level.
Understanding foundation depth is important before constructing DPC layers. Learn more in our guide on minimum depth of foundation for residential buildings.
Core Sources of Moisture Penetration in Buildings
To design an effective damp proofing system on-site, a structural engineer must diagnose where and how moisture tries to compromise the superstructure:
Standard Thickness Specifications for DPC
The physical thickness of a Damp Proof Course depends entirely on the type of material chosen for the barrier layer. However, across standard residential and commercial construction projects, concrete-based DPCs follow fixed structural benchmarks:
- Standard Cement Concrete DPC: The industry-standard thickness is 38 mm to 50 mm (1.5 inches to 2.0 inches). It uses an M15 or M20 grade concrete mix packed with small coarse aggregates (typically 10 mm to 12 mm maximum downsize down to ensure dense packing).
- Cement Mortar DPC: Used primarily in lighter partition wall setups, featuring a thickness of 20 mm to 25 mm (1 inch) of rich 1:3 cement-sand mortar mixed with proprietary waterproofing liquid.
- Asphalt or Bituminous Felt DPC: Applied in a thin, continuous layer of 3 mm to 6 mm directly over a smooth, leveled cement bed.
- Stone Slabs (Slate/Granite): A natural, impervious layer using slate or polished granite slabs ranging from 25 mm to 40 mm thick, laid over a thin bedding mortar.
Comprehensive Classification of DPC Materials
Choosing the right material for a Damp Proof Course requires understanding its flexibility, durability, and resistance to structural movement. DPC materials are broadly classified into three primary categories:
1. Rigid Materials
These materials are entirely inelastic and cannot tolerate structural shifting or building settlement without cracking.
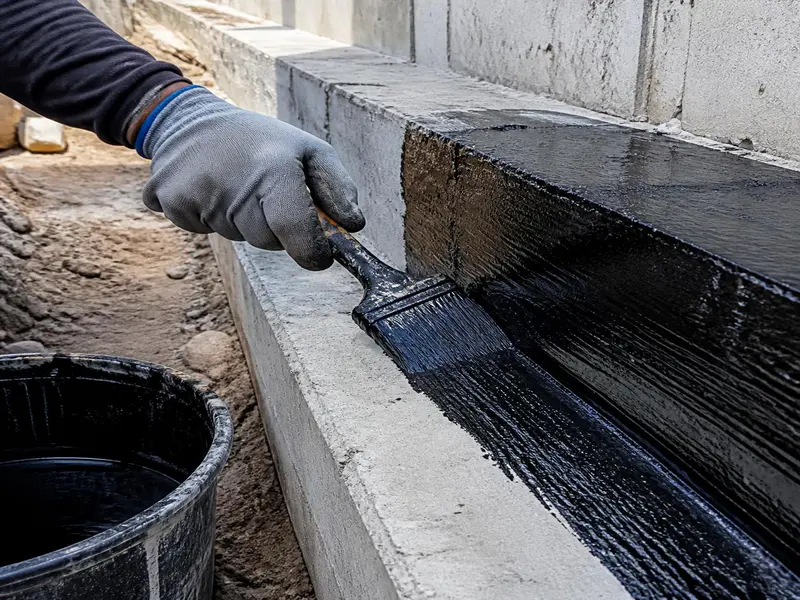
- Rich Cement Concrete (M20 Grade): Excellent for handling high structural compressive loads from upper walls. It must always be treated with a top coat of hot bitumen or a liquid waterproofing compound to seal microscopic concrete pores.
- Mastic Asphalt: A completely impervious, solid combination of asphalt bitumen and fine mineral aggregates. It is heated and poured hot onto the wall bed, creating a seamless, long-lasting moisture barrier.
- Stone Slate or Polished Granite: Natural stone slabs with low porosity. They provide a durable barrier but increase labor costs because the stone joints must be perfectly sealed with waterproof mortar to prevent moisture leaks.
2. Semi-Rigid Materials
These materials offer a balance of structural strength and minor flexibility.
- Bituminous Asphalt Layer: A hot-applied liquid asphalt layer troweled onto the plinth top. It accommodates micro-movements but can squeeze or bleed out under heavy wall loads in hot climates.
- Plastic/Polymeric Membranes: Heavy-duty Polyethylene (LDPE/HDPE) sheets ranging from 500 to 1200 gauge. They are highly flexible and waterproof but can puncture easily if laid over rough, un-sanded masonry surfaces.
3. Flexible Materials
- Bituminous Felts (Hessian or Fiber Base): Rolls of fibrous fabric heavily saturated with bitumen asphalt. They flex easily without tearing, making them ideal for complex wall corners, plinth steps, and structural expansion joints.
Core Mathematical Formulas for DPC Material Estimation
Unlike general concrete beams or columns which are calculated in cubic volumes, a Damp Proof Course (DPC) in Construction is estimated and measured in terms of surface area (Square Meters or Square Feet). However, to purchase the raw materials (cement, sand, aggregate, and liquid waterproofing chemical), you must calculate the underlying material volumes using these plain text formulas:
- Surface Area of DPC = Total Length of Walls x Width of Walls
- Wet Volume of DPC Concrete = Surface Area of DPC x Design Thickness of DPC Layer
- Dry Volume of Concrete = Wet Volume of DPC Concrete x 1.54
- Volume of Component (Cement/Sand/Aggregate) = (Individual Ratio Part / Sum of Total Ratio Parts) x Total Dry Volume
- Total Waterproofing Liquid Required = Volume of Cement used x Chemical Dosage Rate
Before providing damp proof course, the plinth beam must be constructed properly. Read our detailed guide on plinth beam in construction to understand its purpose, size, and reinforcement details.
Practical Step-by-Step Material Estimation Example
Let us run through a real-world calculation example for a standard residential layout to find the exact raw materials required to cast a concrete DPC layer.
Project Specifications and Input Dimensions:
- Total Cumulative Plinth Wall Length: 45.0 meters
- Width of the Plinth Walls: 0.23 meters (230 mm or 9-inch wall)
- Design DPC Thickness: 0.05 meters (50 mm or 2 inches)
- Concrete Mix Design Grade: M20 Grade Concrete (Volumetric Ratio = 1 : 1.5 : 3)
- Waterproofing Additive Dosage: 200 ml of liquid waterproofing compound per 50 kg bag of cement.
Step-by-Step Volumetric Breakdown
Step 1: Calculate the Total Surface Area of DPC
Multiply the wall length by the wall width to find the area for your billing sheets:
- Surface Area of DPC = 45.0 meters x 0.23 meters = 10.35 square meters (m2)
Step 2: Calculate the Finished Wet Volume of Concrete
Multiply the calculated surface area by the specified design thickness:
- Wet Volume = 10.35 square meters x 0.05 meters = 0.5175 cubic meters (m3)
Step 3: Convert Wet Volume to Total Required Dry Volume
To account for particle packing and void shrinkage when water mixes with dry aggregates, apply the standard concrete multiplier factor of 1.54:
- Dry Volume = Wet Volume x 1.54
- Dry Volume = 0.5175 x 1.54 = 0.797 cubic meters (m3) [1]
Step 4: Calculate Individual Material Volumes for M20 Mix
- Sum of Mix Ratio Parts = 1 (Cement) + 1.5 (Sand) + 3 (Aggregate) = 5.5
- Volume of Cement Required = (1 / 5.5) x 0.797 = 0.145 cubic meters (m3)
- Volume of Sand Required = (1.5 / 5.5) x 0.797 = 0.217 cubic meters (m3)
- Volume of Coarse Aggregate Required = (3 / 5.5) x 0.797 = 0.435 cubic meters (m3)
Step 5: Convert Material Volumes into Standard Commercial Units
- Number of Cement Bags = Volume of Cement / 0.035 (since 1 cement bag equals 0.035 m3)
- Number of Cement Bags = 0.145 / 0.035 = 4.14 bags (Round up to 5 bags for purchase)
- Total Waterproofing Liquid = 4.14 bags x 200 ml = 828 ml of liquid compound
Transforming DPC Material Volumes into Commercial Market Units
Material suppliers and local hardware yards invoice construction items using localized commercial weight or volumetric metrics. Below is the converted procurement matrix for the 45-meter DPC project:
Volumetric Transformation Constants:
- 1 Cubic Meter (m3) = 35.3147 Cubic Feet (CFT)
- 1 Brass = 100 Cubic Feet (CFT) = 2.8317 Cubic Meters
- Average Compacted Bulk Density of Construction Sand = 1600 kg/m3
Complete Commercial Material Order Matrix
| Material Component | Pure Calculated Value | Volume in Cubic Feet (CFT) | Weight in Kilograms / Metric Tons | Final Commercial Purchase Order Quantity (With 5% Site Wastage Included) |
|---|---|---|---|---|
| Cement (M20 Mix) | 0.145 m3 | 5.12 CFT | 207 kg | 5 Bags (250 kg total) |
| Construction Sand | 0.217 m3 | 7.66 CFT | 347 kg (0.347 t) | 8.1 CFT Ordered |
| Coarse Aggregate (10mm) | 0.435 m3 | 15.36 CFT | 696 kg (0.696 t) | 16.2 CFT Ordered |
| Waterproofing Compound | 828 milliliters | – | – | 1.0 Liter Bottle Ordered |
| Bitumen Top Coat Paint | 10.35 m2 Area | – | – | 2.5 Liters of Bitumen Emulsion |
On-Site Quality Control Framework and Field Precautions
Even small mistakes or gaps in a Damp Proof Course layer can give moisture an entry point, compromising an entire wall section. Site supervisors must strictly follow these engineering quality control rules:
1. Plinth Surface Leveling and Preparation
- Before pouring the DPC layer, clean the top surface of the brick masonry plinth wall using wire brushes to remove all loose mortar scraps, dirt, and dust.
- Dampen the brickwork with water before casting the concrete DPC. This prevents dry bricks from sucking moisture out of the fresh concrete mix, which would weaken the layer and cause shrinkage cracks.
2. Aggregate Size Selection Control
- The Critical Rule: Never allow standard 20 mm coarse aggregates into a 38 mm or 50 mm thick DPC layer. Large stones create structural voids and cause honeycombing across the thin layer.
- Always use graded coarse aggregates with a maximum size of 10 mm to 12 mm. This ensures a dense, compacted, and void-free concrete barrier matrix.
3. Continuous and Level Pour Mandate
- The DPC layer must run completely across the full length and width of the wall without any structural breaks or gaps.
- Ensure the top surface is finished with a smooth wood float. Never leave it rough. A smooth surface ensures that the secondary bituminous coating or membrane sheet adheres perfectly without air pockets or punctures.
4. Continuity Check at Door Openings
- When a DPC layer reaches a door opening, do not stop the pour abruptly at the frames.
- The DPC layer must continue vertically downward into the floor rebate and connect with the under-floor damp proof membrane. This creates an unbroken, continuous protective envelope across the entire floor layout.
Frequently Asked Questions (FAQs)
Q1: Can a Damp Proof Course (DPC) take structural vertical wall loads?
Yes. A concrete DPC layer using an M20 mix grade has high compressive strength. It handles vertical structural loads from upper walls without cracking or compressing, while blocking ground moisture.
Q2: What happens if you do not provide a DPC in residential construction?
Skipping the DPC layer allows ground moisture to travel upward into the walls via capillary action. This leads to crumbling plaster, damp wall patches, salt efflorescence, peeling paint, and unhealthy indoor air from toxic mold growth.
Q3: Is it necessary to apply bitumen on top of a concrete DPC layer?
Yes. Concrete naturally has microscopic pores and capillary channels. Applying two coats of hot bitumen paint or a specialized elastomeric membrane over the cured concrete DPC seals these micro-pores, creating a completely reliable moisture barrier.
Q4: At what exact building level should the DPC layer be installed?
The DPC layer must be installed right at the plinth level of the building framework. It should sit at least 150 mm to 300 mm above the external ground level to protect the lower walls from mud accumulation and rainwater splashback.
Q5: What is the ideal concrete mix ratio for a high-quality DPC bed?
The ideal concrete mix design for standard residential and commercial DPC work is M20 Grade Concrete, which follows a nominal volume ratio of 1 : 1.5 : 3 (1 part Cement, 1.5 parts Sand, and 3 parts Coarse Aggregate).
For official building standards and construction guidelines in India, you can refer to the Bureau of Indian Standards (BIS) website which publishes the National Building Code and structural design standards.
Conclusion
Installing a precise, unbroken Damp Proof Course (DPC) in Construction is an essential technical requirement to defend your building against the long-term threat of rising damp. By stopping ground moisture right at the plinth level, a DPC protects interior plaster finishes, prevents efflorescence, and secures the structural bonding strength of your masonry walls.
Achieving long-term protection requires close attention to quality control on-site: maintaining a continuous design thickness of 50 mm, using small 10 mm aggregates to eliminate internal voids, and treating the cured concrete layer with a protective bitumen top coat. Investing in quality damp proofing during the early plinth construction phase protects your building budget and ensures your structure remains dry, durable, and healthy for decades.
Shakeel T is a qualified Civil Engineer and Structural Consultant with extensive on-site experience in residential and commercial building construction. Specializing in material estimation, cost budgeting, and structural safety guidelines, he has successfully managed multiple real estate projects from foundation to finishing. Through this blog, Shakeel shares field-tested civil engineering thumb rules, IS Code practices, and practical site tips to help home builders execute their projects efficiently and within budget.
Education: Diploma in Civil Engineering
Expertise: Quantity Surveying, Material Estimation, Structural Design, and Site Management.
excellent